
Fitting the Freya knit dress
- MingMakes

- Jan 27, 2022
- 8 min read
Updated: Sep 23, 2022
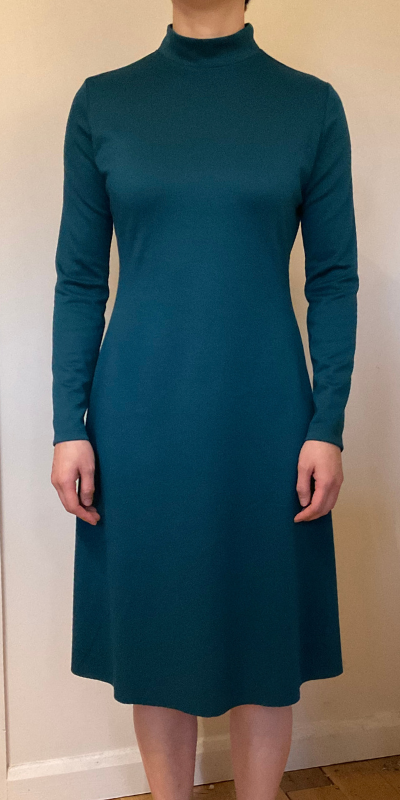
This is the third pattern in the Tilly and the Buttons book Stretch! teaching how to sew with knits. The second pattern was the Frankie T-Shirt, a raglan sleeve top which was my first knit top. The sleeve design was fairly forgiving in terms of fit, and I learnt only after finishing it that I needed a swayback adjustment, and that different types of knit can change the fit quite substantially. I was determined to use my learnings in the next pattern - the Freya Top and Dress. I made the dress version in a teal ponte roma from Croft Mill. Here is my full review.

Prior to starting this project, I looked up resources on how to fit knits. I have tried the Palmer/Pletsch method of tissue fitting which is helpful but I find it tricky to do on myself and have therefore always made a toile of bodices. I also wasn’t sure if it would be relevant to knits given the stretch of the fabric and negative ease. I came across their Craftsy course Fitting Fashion Knits the Palmer/Pletsch way which I found really useful.

In fact this course prompted me to sign up to the Craftsy membership. It costs $80 / £60 a year and you get unlimited access to over 1500 video classes (about 200 are for sewing). For me that's well worth it as an efficient and effective way of learning. In this particular course, they go through the full fitting process on someone along with the pattern work for a darted top, wrap top and trousers. They still use the tissue fitting method but reduce the dimensions or fit it tightly to allow for the stretch. This method really appeals because it doesn’t involve a toile which is time consuming and uses a lot of fabric. I wasn’t sure how well it would work with my level of experience but I was willing to experiment on this project.
Sizing

I have a larger upper bust measurement than my full bust, so I sized up for the bust and above area. It was interesting to note that the Palmer/Pletsch method recommends using the high bust measurement to choose pattern size from the bust measurement, and then doing bust adjustments after that if needed.
I cut size 5 for the bust, shoulders and sleeves, size 4 for waist and size 3 for hips. My waist and hip measurements matched the chart. I tried tissue-fitting but just couldn't ensure that I had it on properly and was able to reproduce the same position when taking it on and off. It did however give me an indication that I needed a full bust adjustment as the tissue was pulling around the bust area and wasn't vertical from the neckline. None of it reached the centre front but I thought the stretch in the fabric might compensate although I didn't know to what degree.

Having seen excess fabric around my back waist in the Frankie T-Shirt, I decided to do a swayback adjustment, and used this post by Ellie & Mac. It's a great detailed post with good photos and explanations. I also tried the tissue on my mannequin and saw the bottom hem tilted a little down towards the centre back, and thought a swayback would help straighten this up. I made the adjustment for 1.5cm.
First toile
At this point, I knew I would be happier making a toile because I just needed to see how it fit in fabric. I didn't have much fabric so only extended down to the waist. I hadn't made the bust adjustment at this point.


Fitting issues
Fitting issues I could see were:
Shoulder seam sat further back than the centre of my arm. This doesn't look too bad in the photo above but when looking in real life, they were too far back.
The centre back gaped out at the waist and the waistline was raised.
Drag lines at the back from the side seams pointing towards the upper back (shown by the white ovals)
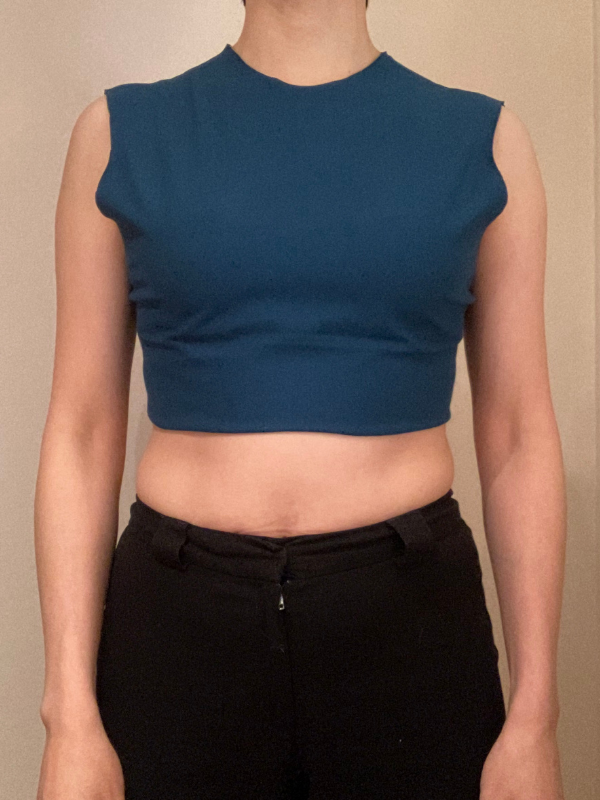
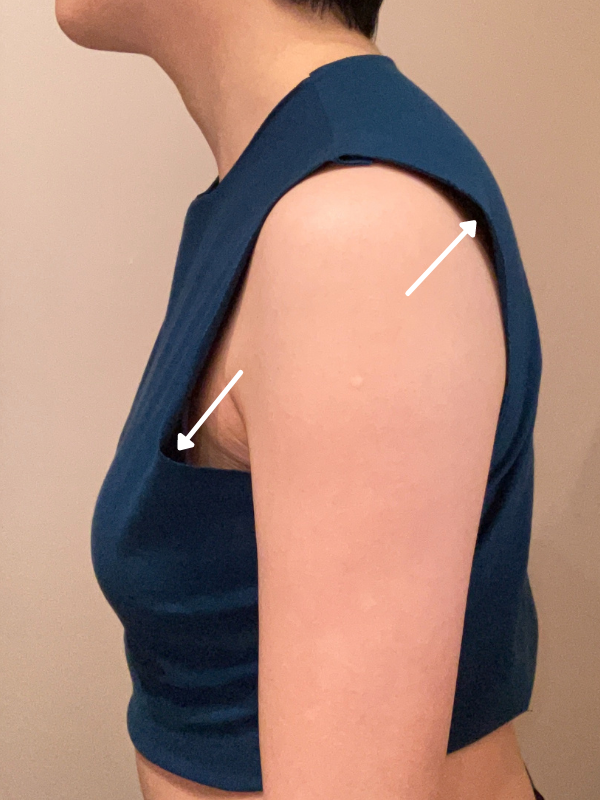
Small gap at back armhole (indicated by arrow).
Full bust adjustment (FBA) was required seen by the tightness around the bust and large gap at the front armhole (indicated by arrow).
Adjustments
Here’s what I did to correct them:
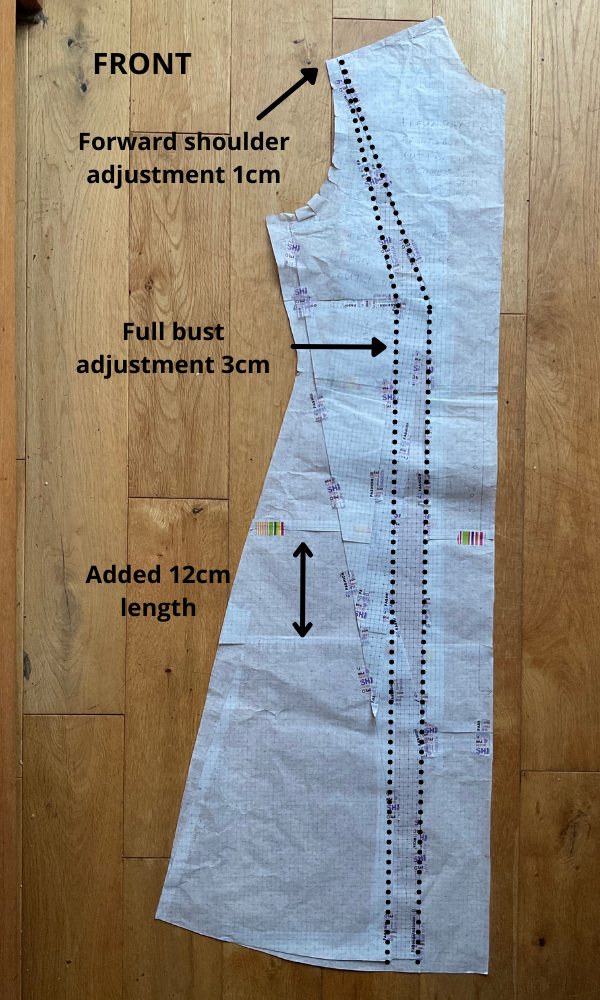
1: Forward shoulder
I did a forward shoulder adjustment of 1cm.
2 + 3 + 4: Back adjustments
All 3 problems seemed to point to a lack of space for my rounded back. I cut across the upper back to see if it would spread apart and it did, telling me I needed more room here. This relaxed the drag lines down the back from the armholes, levelled and reduced the gaping round the waist, and reduced the back armhole gap.

In the Palmer/Pletsch book, they recommend a maximum of 1.5cm upper back adjustment at the neckline seam, and if further adjustment is needed then to do it as a lower round back adjustment which I did for another 1.5cm. I’m not entirely sure why they recommend this but maybe it’s to avoid distorting the neckline too much.
On a woven, these adjustments might have required the addition of a centre back seam as it was now curved (this dress doesn’t have one as it is cut on the fold), or a neck/shoulder dart. I thought the stretch of the fabric might be able to take care of it. Also, with the swayback adjustment taking the original centre back line away from the fold, the rounded back adjustments would help bring it back and so I thought there might be a way to balance them out.
Read my separate blog post on doing a rounded back adjustment without a centre back seam or shoulder dart.
5. Full bust adjustment (FBA)
Since there were no darts and it being a knit pattern, I thought a simple FBA could work and used the technique from this post by Helen’s Closet.
Length
I lengthened the skirt by 12cm to have it knee length. The lengthen/shorten line was above the hip notch, so drawing a straight line from here down to the hem would have made the hip narrower. I was nervous of making the hip area too tight so I kept the line going out from the waist as in the original pattern, and then curved it down to the hem.
Second toile
I made another toile out of scrap fabric since I’d made quite a few changes. This was much better, but just needed a few tweaks.


Fitting issues
Fitting issues that remained were:
Larger swayback adjustment required seen by the excess fabric around the waist
There were still some drag lines coming from the back side seams and a small gap at the back armholes, so I wondered if I needed more of a rounded back adjustment. I cut across the lower round back adjustment line and it spread apart (see photo below), indicating I did need more room here. The drag lines also disappeared.
More room was still needed for the bust, seen by the small gap at the left front armhole, and drag lines to the side seam. It also just felt tight across the upper bust, a common problem for me.

Adjustments
Here’s what I did to correct them:
1: Swayback adjustment
I increased this and made it for a total of 3cm. The Ellie & Mac post describes taking the side seam in around the waist to compensate for the larger waist created by the swayback adjustment, but I decided to leave it at this point in case I needed the width. I could always take the side seam in further if needed.
2: Rounded back adjustments
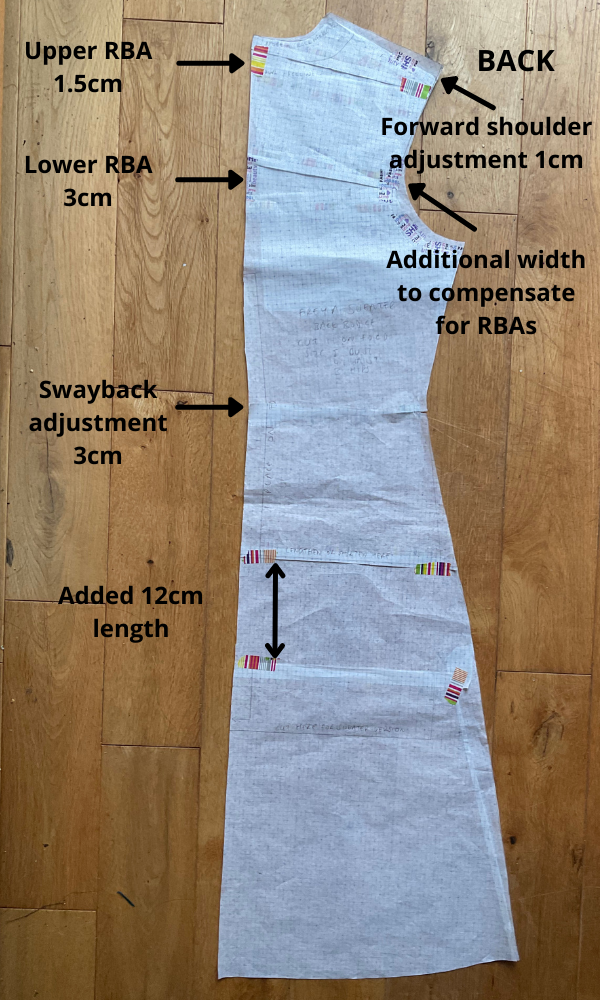
I left the upper RBA at 1.5cm and increased the lower RBA from 1.5cm to 3cm. I used the same technique as described above, in this separate post (link).
3. Full bust adjustment
I removed the original FBA and did a larger one for 3cm on the pattern piece ie. 6cm total, by following this post by Helen’s Closet for a FBA with no darts. My second toile still felt a little tight at the upper bust so I made the FBA with a steep line towards the top of the armhole to give additional room here too.
Here are the pattern pieces with the various adjustments indicated. Note that I didn't add paper to straighten up the fold where the swayback adjustment was made. I just made a note to put the back piece on the fabric with the neckline and hem touching the fold.


Final fitting
At this point I would have made another toile if I had enough fabric, but I didn’t so I decided to go for it. This was the result: Too big!


I decided to take in the side seams to make it fit better, and made an adjustment to the sleeve to make it narrower, using the same method as described in this post of how I fitted the Frankie T-shirt. I cut this within the original sleeves.

This was better but still a bit roomy around the biceps, so I took a little out of the underarm seam here but keeping the width around my forearm which seemed about right, as well as allowing enough width to roll the sleeve up a little. The arrows indicate where I cut the pattern to.

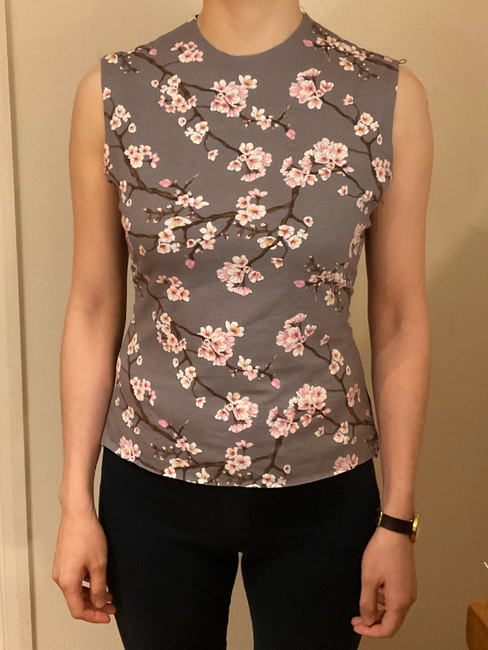
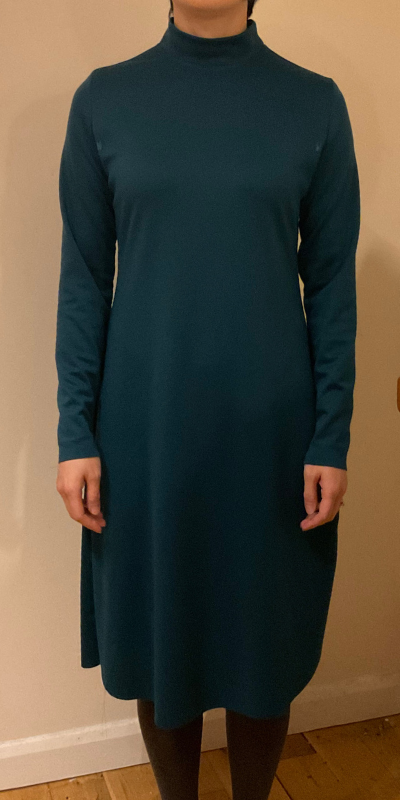
This was the result after taking in the side seams and sleeve adjustments. The hem hadn't been sewn yet in these photos.


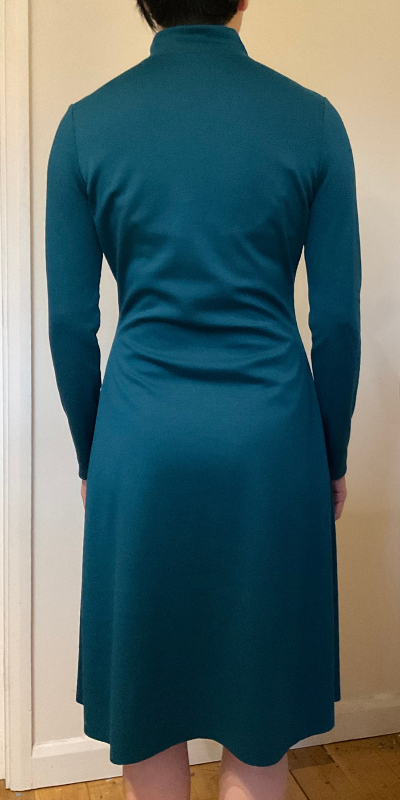
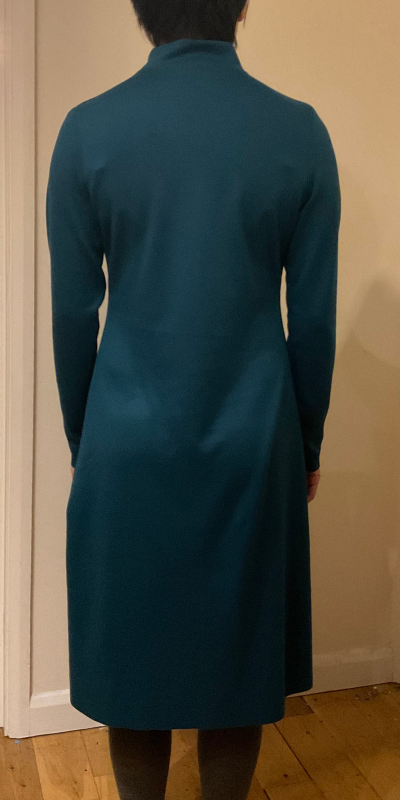
I was very happy with the front and sleeves, but the back looked awful. I pinned more fabric out at the waist to see if a larger swayback would help.

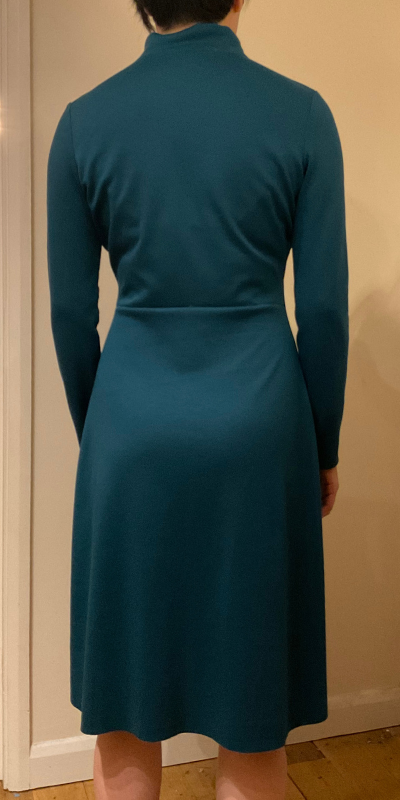
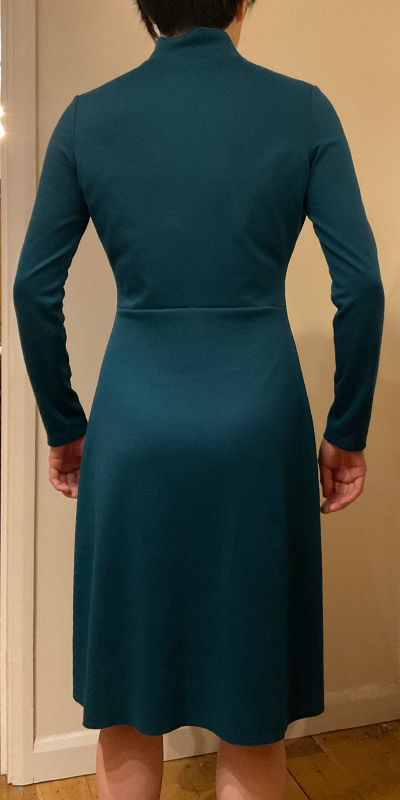
This looked better and so I took the decision to put a waist seam in the back. Not ideal but I thought it looked better than all the loose fabric. I pinched out another 3cm like a sideways dart.


Here is how it looked before pressing (wasn't sure I wanted to commit yet!). I decided to keep it as is but was still bugged by the drag lines from the side seam. I wondered whether I had the armhole too low down and perhaps had a sloping shoulder I hadn't accounted for, as when I raised my arms slightly, all the drag lines disappeared. This is certainly something I will take into consideration on future projects.


Note on fitting resources
The tissue fitting technique didn't quite work for me but gave me some indication of obvious problems. However that doesn't take away from the Palmer/Pletsch book which is a fantastic resource for fitting, adjustments and pattern work. I referenced it a huge amount during this project and they seem to cover every scenario.
I would also recommend Sarah Veblen's The Complete Photo Guide to Perfect Fitting which covers fitting with a muslin / toile.
During this project I also discovered Alexandra Morgan of In-House Patterns Studio, who runs courses on fitting. I found a couple of her videos very informative and will consider signing up to her courses in the future.
Find me on Instagram, Facebook, YouTube, Bloglovin' or scroll to the bottom to subscribe to my monthly newsletter.
Links
I have no affiliations, I'm just a keen buyer and user. A UK supplier may be linked, please try to source items from your favourite independent stores.


Comments