
Fitting the Frankie T-shirt
- MingMakes

- Nov 14, 2021
- 5 min read
Updated: Jul 21, 2022
The Frankie T-shirt is a baseball shirt and when I came across it in the Stretch! book, I felt it wasn't really something I was going to wear a lot, and so I made some changes to help pair it with other stuff in my wardrobe. This post is about my fitting process, my full review of the pattern can be found here.

I intended for my final garment to be more fitted than the pattern is meant to be and so had this in mind as I went through the process. Here is the original pattern:

Choosing pattern size
I cut a size 4 grading to size 3 at the waist and hips. My bust measurement puts me at size 3 but my upper bust is the same as my full bust measurement so I sized up. My waist fell between 3 and 4, and my hip measurement matched size 3. I shortened the length by 5cm.
Fitting the sleeves
Just before I started this project, I signed up to a live online course by Sarah Veblen on sewing.patternreview.com called Common Raglan Sleeve Fitting Issues.

I found this very useful having not made anything with a raglan sleeve before, and not having much in my RTW wardrobe in this style. The general theme was that a seam down the sleeve was very helpful in adjusting the fit, and in reducing the folds of fabric coming down from the armhole.
However for this particular pattern I wanted to make a smartish top with black jersey fabric for the main body and stretch lace for the arms having been inspired by this lovely make by Samantha of sammieseams on Instagram, and so I didn’t want a seam to show down the arm on the lace.

First toile
I was quite pleased with my first toile, perhaps because this is a knit fabric so problems with fit aren’t quite so obvious. I had needed to make many changes to the bodices in patterns from Love At First Stitch and so it was refreshing that I wasn’t totally off with the first toile. For speed of unpicking, I just pinned the side and sleeve seams.


Things I wanted to change on this toile were:
Move the raglan seam to the armhole crease. The seam was about 2cm inside where it should be (see photos below where my finger points to my armhole crease). This wasn't too much of a surprise with my large upper bust relative to my full bust measurement.
Reducing the folds of fabric that can be seen on the sleeves, from the outer upper arm down towards the side seams.
The width of the sleeves was as the pattern intended, but I wanted them more fitted.


This is how I approached each issue.
1. Move the raglan seam
Instead of moving the raglan seam, I only widened the front and back pieces here, as I knew I wanted to do something else to the sleeves as described in the next section. The photo below shows the front and back pieces, with the arrows indicating where the original pattern ended.

I then trued all the seams with the sleeve which necessitated some width off the sleeve pattern. A line was cut where indicated in the photo of the sleeve piece below, with the same on the other side.

2 + 3. Reduce the folds of fabric on the sleeve and make the sleeves more fitted
I hoped to reduce the folds of fabric by making the sleeves tighter. In a method given in the Palmer Pletsch book there is a pattern modification that both reduces the width of the sleeve and gives it more length in this area which was exactly what I needed to help reduce these folds of fabric. The method involves slashing the pattern piece down the grainline and across base of the armholes.
The photo below shows the 4 hinge points indicated with black arrows, where you don't cut all the way through but leave a small hinge attached, cutting through the pattern up to this point, and through the seam allowance from the other end. The pattern piece is for a full sleeve but I wanted a 3/4 sleeve, which is why the bottom hinge appears further up the pattern.

You then start to pull the top and bottom of the pattern which creates an overlap indicated by the red arrows. When comparing it to a fairly fitted knit top I already own, this gave me an indication of how much width to take off which was quite a bit. The overlap on the pattern piece is about 8cm. The photo below shows the final amount of overlap with bits of washi tape to secure it. This also created a good amount of extra length which would help with the folds of fabric.

Here is the final piece traced out and with the additional length removed. I redrew the curved sleeve hem as the adjustment process above made it an odd shape.

Second toile
I was pleased to see the folds of fabric from the armhole much reduced. The photos have been made much brighter to help see this on the dark fabric, hence me looking like a ghost :)


The sleeve length on this second toile is shorter than the pattern, as I cut the new sleeves from within the first toile sleeves to save on fabric, being more concerned with the fit than the length. These sleeves are about 4cm shorter than that on the pattern, but I decided this was a better length for me taking into account the hem.

I also wanted to take in some of the width around the forearm to make it more fitted, as the pattern piece flares out slightly here compared to the upper arm, due to there being a hinge here for the pattern modification. I therefore cut along the lines indicated by the arrows in the photo below.

The lace I used for the sleeves had a lovely edge that I wanted to use instead of hemming it.

I marked on the pattern piece the 2cm hem so I could cut the lace shorter.

I used a double tracing wheel to mark this out (albeit a bit wobbly, not sure what I was drinking at the time!). Here is my short blog post and video on how to use this brilliant time-saving tool.

And here is my finished version, paired with the Bibi Skirt from the same book.

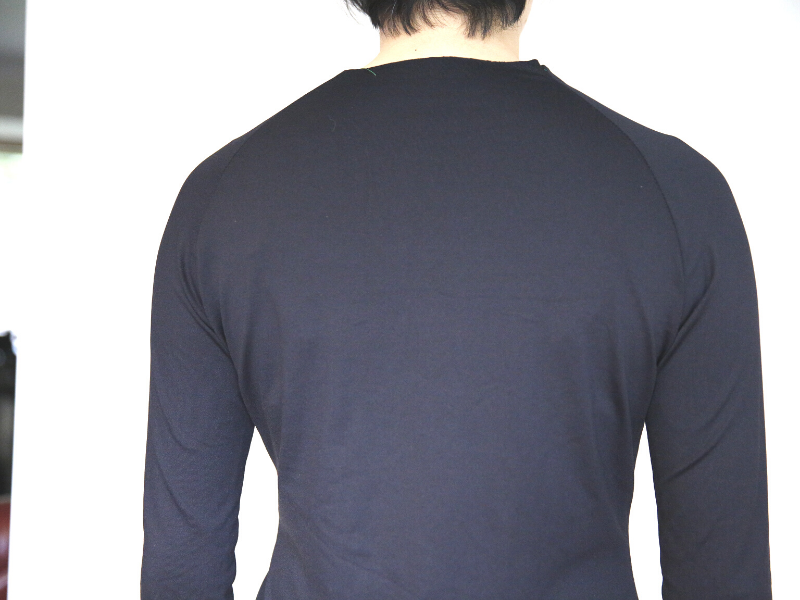
Something that wasn’t so apparent on my toile was the need for a swayback adjustment as seen by the excess fabric around my waist at the back on the finished item. I had also reduced width at the hips on the final garment, resewing the side seam from the waist downwards, and maybe this exaggerated it.

It was too late for me by this point, but I bookmarked this useful tutorial by Ellie & Mac for future reference if sewing this again. It details two techniques, for bodices with and without a centre back seam.
The fabric I used for the toile was slightly more lightweight, drapey and stretchy than my final fabric so the fit does look different, with drag lines looking a little more obvious. I will most likely wear this top tucked in anyway, so it shouldn't be quite as noticeable. I was really pleased with the finished result and would consider a more casual version as a warm up top.
Read my MingMakesMistakes post about the Frankie T-Shirt which focusses more on the construction method.
Find me on Instagram, Facebook, YouTube, Bloglovin' or scroll to the bottom to subscribe to my monthly newsletter.
Links
I have no affiliations, I'm just a keen buyer and user. A UK supplier may be linked, please try to source items from your favourite independent stores.


Comments