
Eden Coat
- MingMakes

- Dec 10, 2023
- 12 min read
Updated: Dec 27, 2023

I had booked onto The Winter Coat workshop with Claire Tyler having already attended her Classic Blazer workshop 6 months prior where I made the Heather Blazer by the Friday Pattern Company. I was ready for a new challenge and decided a coat would be the next step. I had never sewn with wool before and wanted a casual jacket with a hood for the upcoming autumn. Sometimes you just want to pop out without having to carry an umbrella.

I decided to go with the Eden Coat by Tilly and the Buttons. It's only available in PDF format on their website, but the printed version is quite widely available in other stores. I purchased mine from Like Sew Amazing.


I planned to make the shorter jacket version in wool with a zip. When I went to the workshop and showed Claire my fabric, she commented that it was such a lovely pattern that it would make the most of it to make it the longer length. I agreed, and luckily I had bought enough fabric. I decided to do the zipped version with snaps rather than the toggles.
This post is a review of the Eden Coat pattern. You can read my review of the workshop itself here.

Sleeve hem (my big mistake!)
Fit
Looking at the size chart, my measurements corresponded to size 4 bust, size 3 waist and hips. Since I have a larger upper bust measurement than full bust, I used this instead to choose the bust size. Before cutting the pattern, I compared the bodice pieces with that of my Sienna Maker Jacket, and with the grading between sizes it wasn't far off and so I went with this.
I made a toile and it seemed to fit pretty well. With a raglan sleeve there is bound to be some folds around the arms, but I wasn't too concerned as I wanted the coat to be roomy enough for winter clothing underneath. I didn't do any further fitting adjustments.


Pattern errors
I purchased the paper pattern but I noticed a couple of errors with the instructions or diagrams which may possibly have been corrected on newer print runs and/or the PDF but I'll mention them here just in case.
1. The instructions specified to cut 4 pocket flaps in interfacing but only two were used, on the outside pocket flaps.
2. The pattern piece for the hood facing included a rectangle where they direct you to attach the interfacing for the snaps, although this entire piece is already interfaced.

However, the photo and wording of the pieces in the instruction show it being attached to the side hood which makes more sense.

Fabric
I used this gorgeous grey, blue and beige checked wool and polyester mix fabric from Like So Amazing. I love this colour theme and it has a lovely soft brushed surface. I washed this at 30° on the woollen cycle and allowed it to air dry. It survived perfectly well and retained its softness.

For the lining, I used royal blue Bremsilk from Bloomsbury Square fabrics which I thought complimented the checked fabric beautifully. I washed this at 30°, and on the low tumble dryer setting for convenience (but since the coat/wool won't be going into the tumble dryer, this wasn't necessary).

Claire recommended underlining the coat with cotton lawn. This was a last minute purchase, buying light blue cotton lawn from Hobbycraft. The colour is not important as it won't be seen, but since I would be seeing it a lot as I was sewing, I picked the colour that looked most appealing to me.
Cutting
Going by the fabric requirements, I had 3.5 m where the pattern asked for 3.4 m for my size in the longer length. We discussed cutting the hood and pocket pieces on the bias to create interest. Since we weren’t sure if I had enough fabric to cut the pieces on the bias I cut all the larger pieces first – the front, back and sleeves. I had plenty of fabric left over, and even after cutting those pieces on the bias (plus re-cutting two of those pieces) I still had more than 1.2m left.

Pattern matching - cutting
Bodice
Claire advised me to make any pattern pieces that were to be cut on the fold into a full piece to cut in single layer. The checked pattern was not symmetrical so we thought it best to put the dominant darker stripe either side of the centre back.

After cutting the sleeves, I matched the underarm point on the sleeves to that of the bodice pieces, which created a nice line across this point.

I recut the front facing piece as I hadn't pattern matched this to the front bodice, and thought it might be seen when the coat was open. The photo below shows the front facing on the jacket's right side pulled out, before I secured it as detailed below in the section on the front flap.

Hood
Having cut all the hood pieces on the bias and with some symmetry, when I went to assemble it I realised the centre hood piece looked odd since the diagonal stripes were a bit random where they met the side hood pieces. I decided this centre piece would look better cut on the grain with the lines horizontal.

Given the curved seam where it meets the side hood, it wasn't possible to pattern match all along, but I had a matching horizontal section at the back where I thought it would be most visible, and matched it to the vertical line running down the back of the coat.

Pockets
I put some symmetry in the pockets, and put some thought into the pocket flaps. It would require incredible accuracy of marking, sewing and cutting to pattern match this with the pocket and so I decided to have the diagonal stripes going the opposite way. This was definitely a head scratcher at the time!


Interfacing

Claire advised using Vlieseline bi-stretch interfacing G770 to allow the wool a bit of movement. Once you had lay the interfacing on the fabric piece, she recommended hovering over the interfacing with the steam on to allow for any shrinkage of the interfacing before fusing it. The shrinkage was noticeable on the longer pieces, such as the front bodice facing, but wouldn't be a problem as this was still within the seam allowance.
The photos below show either end of the front facing piece after steaming the interfacing and then fusing.


Construction
Underlining
I started by basting the cotton lawn underlining to the fabric pieces. It was here that I was introduced to Gütermann basting thread which is designed for the task and breaks easily. This is particularly handy for the times when you sew over the basting thread, it makes it easier to remove. I basted within the seam allowance and removed it after sewing that particular seam.
I used tailors tacks to mark the snap fastenings and pocket corners, as my usual go-to Prym Aqua Trick Marker was not showing up well on the wool.


Stay stitching
I stay stitched the neck lines and raglan seams which was also required on my very slippery lining. Claire advised using a straight stitch foot, and to use the other hand to help guide the fabric out the back of the machine to keep it flat. This worked well for me and I didn’t have much in the way of puckering.

I have mixed feelings on stay stitching, wondering if in my hands I have a tendency to cause more stretching in the process. I have a feeling I did this on the lining pieces as they didn't always line up that well, but I wasn't sure if that was because of inaccuracy with the cutting as well.
Pockets
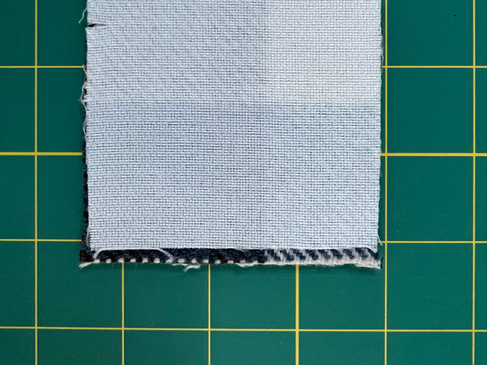
The pattern directs you to use the fabric on both front and back of the pocket flaps. I agreed with Claire that this may be bulky and so cut two lining pieces instead, plus it would be a nice contrast when opening the pocket. As directed in the pattern instructions, I trimmed the lining 2 mm smaller to allow it to roll underneath and did the same for the main patch pocket linings.

It wasn't the tidiest on the inside but I wouldn't see inside of the pockets, and the inside of the flap wouldn't be visible most of the time.

One small detail I forgot was to change the bobbin thread when topstitching, and so the stitching shows underneath.

Having enjoyed hand sewing the patch pockets onto my Heather Blazer, I decided to do the same for this coat. Since I had already topstitched the flap, I did the same to the pocket and then hand sewed them on. I could have saved a step by topstitching them with the machine directly onto the bodice, but on my Sienna Maker Jacket project, I found the pocket had a tendency to move slightly, even when basted in place. In that instance I used Prym Wonder Tape which worked really well, but I didn’t want to add any further bulk here, particularly as I knew it would not go into the wash very often, if at all.

I positioned the pockets a touch higher than where the pattern stated, so it would line up with one of the horizontal checks. When sewing on the pocket flaps, they are meant to be sewn with the raw edge 1.5 cm higher than the top of the pocket. I positioned them a little higher at 2 cm as Claire had recommended an extra step after this of sewing the pocket flap lining to the front bodice so that the raw edge of the pocket flap wouldn't show. If making this again, I would have made the pocket flap a little longer to account for this, or stay stitched the raw edge at 0.5cm, rather than 1cm.

I decided to trim the seam allowance on the pocket flap to around 0.5cm, so there wouldn't be so much to cover on the inside. I didn't edge stitch the top of the flap as recommended in the instructions as I thought it looked better without. If I had given this more thought earlier in the project, I wouldn't have edge stitched the flap or the pocket as the checked pattern gave enough visual interest. For the same reason, I didn't topstitch anything else they mentioned - the raglan seem allowances, hems, hood and front edge.
A great tip that Claire gave me was to hand sew the pocket flap lining to the front of the coat so that the raw edge wouldn't show. I did a ladder stitch and this worked beautifully.


Pattern matching - construction
Having spent a decent amount of time and effort trying to cut the pieces to ensure good pattern matching, I totally forgot this when I stitched the first side seam! I couldn't bear to leave this as it was, and so I unpicked it. I re-pinned it ensuring the stripes matched up with the pins horizontally marking each stripe.


I sewed slowly up to each pin and then used the hand wheel to get as close as I could to it before removing it. I was so pleased with the result as well as the beautiful intersecting seams, not that anyone is going to look under my armpits!


Lining
The instructions guide you to bag out the lining but Claire was uncomfortable with the idea of pulling this bulky coat through a hole. Along with trying to insert the zip, this took a bit of thought as to how best to attach the lining. In the end we worked out that our method was essentially the same as the pattern instructions, except not leaving the gap to bag it out in the arm but turning it inside out by the entire bottom hem and then handsewing the lining at the bottom and sleeve hem. Since I was not exactly following instructions during the workshop, I had forgotten to insert the hanging loop.


I added a little hidden label underneath, a rabbit that signifies this was made in my year of the Rabbit in the Chinese zodiac.

Zip
Since I originally wanted to do the short jacket, I bought a short zip. Thankfully Claire had some longer zips available. It wasn't as long as the full length of the coat, but I did think it might be difficult to sit down if the zip went all the way to the bottom and so I kept with the shorter zip.

Sleeve hem
My big mistake and solution!
I only made this mistake because I wasn't following the instructions at this point, so do skip to the next section if you are being sensible :)
Having sewn the lining to the bottom hem facing, I went to do the same with the sleeves. I folded up the sleeves to see what length I wanted it. I folded up 5 cm which seemed about right. For some reason I had it in my mind about the 1.5 cm seam allowance and so I proceeded to cut off the additional 3.5 cm on the coat sleeve and the lining, then realised that this would mean the lining would be attached very close to the end of the sleeve, and possibly pull on the inside.
The only thing I could think of at this point was to reduce the amount I folded the lining under by. Where it was meant to be 1.5 cm I made it about 0.5 cm, and I handsewed this close to the raw edge of the wool.

It made me laugh (well, after crying!) because the 5 cm I had already folded up was absolutely perfect without any further intervention.
Having done this, I could see that the lining was still pulling inside the sleeve and so I decided to do it properly and cut a sleeve hem facing, similar to that at the bottom hem. I cut it a bit longer to account for the fact that I'd also cut the lining shorter by 3.5cm. I cut the sleeve facing 8cm wide (7cm for the 3.5cm on the sleeve plus 3.5cm on the lining I had cut off, and a 1cm seam allowance to attach it back to the sleeve).
I used basting thread to remind me where the sleeve should end.

I sewed the facings into a loop, then attached them to the sleeves, pressing them so the seam was on the inside.

I then used fell stitch to secure the lining, the same as for the bottom hem.

I was pretty happy with the result, the sleeve was rescued.

On putting my arms through the sleeves, there was a tendency for the facing to be turned back out again and so I secured the junction of the lining and facing to the sleeve with some small stitches that weren't visible on the outside. I only did this in 4 places on each sleeve - at the seam and the quarter points, and this worked really well.

Front flap
The front flat that overlaps the zip is meant to be topstitched, but as mentioned before, I didn't want to put a line of stitching to break up the checked pattern. However, I did want to secure it in some way as it had a tendency to open up as shown in the video below.
I pinned the flap in place and then handsewed a few stitches that wouldn't be visible on the outside, in the ditch where the zip meets the inside of the flap,

However, this did not improve things and the flap still stuck out.

I realised this was because my hand stitches were sewn through the zip tape. When the zip is done up, this side of the zip folds back on itself, and so it made sense to stitch it so that the tape stayed flat when it was done up. This meant hand sewing in the same place, but folding the tape out of the way underneath (2nd photo).


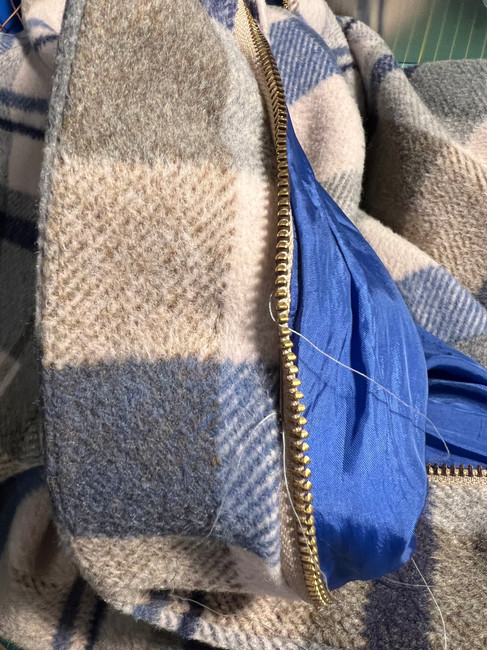
I sewed several stitches on top of each other, level with where the snaps would be and at the halfway points between them. This was much better, but I felt it needed a little more. I decided to also secure the tape on the other side of the zip teeth to prevent this from folding back.

All of this work really well, and I was very happy with the result.


Snaps
This was a nerve wrecking moment for me as I had never inserted snaps before. I used the Prym Antique Brass Anorak 15 mm Press Snaps as these matched the colour of the zip quite closely, and bought the Prym Vario Pliers whilst at the workshop for easy insertion. I had a practice go and a few dud goes on the real thing which meant I had to order another packet as I was one short. At the same time, I ordered the Prym Revolving Punch which made a much neater job than me poking a hole through the fabric and then stretching it over the shank.


I inserted the female outer snaps first, and then carefully lined up the male part of the snap. I wanted to ensure the pattern matching was spot-on with the snaps done up. I call this a win :)

Summary
I am so proud of this make. I am very glad I joined a workshop to make it not only for the guidance, but also that it forced me to dedicate a solid few days to making it. The fabric totally elevated the coat and while it was a pain to cut, it was so worth it.


What I love
The fabric and pattern combo
The deep patch pockets
The warmth and practicality of this coat with a hood
What I would change
If sewing with another patterned fabric, I would omit the topstitching
Size down on the waist and hips as it is pretty roomy, even with bulky winter clothing underneath
What I discovered
This was yet another great workshop experience, and after returning home from this, I booked onto Claire Tyler's Kelly Anorak workshop, another garment that would be a challenge for me. I've said it many times before, but I really love the advanced learning and sewing that happens in a workshop, in addition to the lovely environment of sewing with other equally keen sewists.
That I need to consider every pattern piece when pattern matching before cutting!
How to underline a garment, and how in this case the underlining of cotton lawn helps with the structure of the coat.
Having the right tools makes a big difference, it was well worth buying the punch and pliers for the snaps.
Find me on Instagram, Facebook, YouTube, Bloglovin' or scroll to the bottom to subscribe to my newsletter which is published every month.
Links
I have no affiliations, I'm just a keen buyer and user. A UK supplier may be linked, please try to source items from your favourite independent stores.


Comments