
Ginger Jeans
- MingMakes

- Sep 16, 2023
- 10 min read
Updated: Mar 6

Sewing jeans was something that has appealed ever since I started my sewing journey, partly because it's hard to find good fitting ready-to-wear jeans, but also because I perceived them to require a fair amount of skill so would be a great challenge.
I decided to enhance my jeans journey by booking onto 2 workshops and buying a book.
Workshop 1: Draft Your Perfect Jeans at Like Sew Amazing
This weekend workshop was totally worth it as I came away with a well-fitting pattern for jeans, by modifying an already fitted trouser block. You can read more about my experience and the basic fitting process here.


Workshop 2: Making Your Perfect Fit Jeans at Guthrie&Ghani
This was another weekend workshop to help with the actual sewing techniques. We had the choice of 3 patterns - I chose the Ginger Jeans by Closet Core Patterns since they were stretch jeans and I wasn’t sure how to tackle this kind of fabric or adjust the fit accordingly. Although I had a fitted pattern from the first workshop, this was for rigid denim so I thought it would be useful to have a pattern for each. There are more details in my review of the workshop itself here.


Book: Sewing Jeans by Johanna Lundström of The Last Stitch
This has so much useful information and tips, along with interesting insights into how RTW jeans are constructed, explaining different types of denim, how best to care for it, fitting advice and detailed explanation of the construction process with photos. I read this book before making them and it helped me gain some background knowledge first.

Since the workshop was heavily guided, I can imagine referencing this book more so when I sew the next pair of jeans myself.
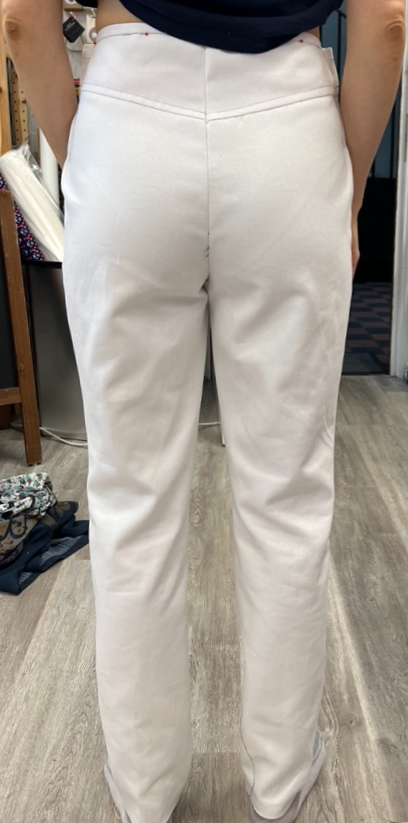
Summary (photos of all views)
Fit and length
As part of the Guthrie&Ghani workshop package, you get a Zoom call with one of the tutors to help advise on sizing and fitting adjustments, so that you can cut the pattern and fabric before the workshop to make the most of the time there. After the useful discussion with Becca, we decided I should cut a straight size 8 as it matched my waist and hips measurement closely.

She gave some good advice about where to adjust the length as it was likely they’d be too long for me, so I shortened the pattern by 2.5cm at the knees. I decided to make the high waisted stovepipe version. Becca emailed some advice on preparing the pattern and resources from the Closet Core website. They also have a sewalong for this pattern.

After basting the jeans together at the workshop, Becca recommended:
1. Take the side seams in by 0.5cm on front and back leg around the hips
2. Reduce the depth of the yolk at centre back by 2.5 cm.
Here's what I did:
1. Take the side seams in by 0.5cm on front and back leg around the hips
Took in 0.5cm at the side seams on front and back leg pieces, ending roughly at the base of the pocket bag.
Took the same amount off the side seam of the pocket bag pieces since they also line up with the front and back leg pieces.
Took the same amount off the side seam of the back yoke piece.
We decided not to adjust the waistband at this point as it seemed to fit well.
2. Reduce the depth of the yolk at centre back by 2.5 cm.
I shortened the centre back on the yolk (the fold line) by 2.5cm from the bottom of the piece, going to nothing at the side seams, trying to keep a smooth curve like the original piece. This created a more rectangular-shaped fabric piece, rather than the classic V-shape. For future versions I would consider adjusting the yoke and back leg pieces to create more of a V-shape on the yoke.

Once I'd sewn up the jeans with only the hem left to do, I shortened them by another 8cm. Having cut off the excess fabric, I then saw the notes from the g&g course that advised holding off hemming until after washing them a few times as they were likely to shrink further in length. It was too late for me by this point, but something to bear in mind on the next version, and I had at least washed the fabric twice before making them.

Fabric
When joining the workshop, G&G give you a 20% discount on fabrics needed and so I bought their washed indigo stretch denim. I washed it twice at 40 degrees and normal tumble dry. Johanna Lundström does mention in her book that tumble drying damages the Lycra / Elastane in stretch denim which will cause it to eventually lose its stretch so I would consider more air drying of my final jeans.

For the pocket linings I used some blue and white striped cotton shirting from Like Sew Amazing, and for the waistband I used a scrap of Japanese metallic cotton leftover from my Clemence Skirt project.

Cutting out
It is recommended to cut jeans in a single layer and cut the paired pieces the other way up to prevent twisting of the legs. The 2 views of the pattern are:
A - High waisted skinny jeans
B - Low waisted with stovepipe legs
Since I wanted the high waisted version with the stovepipe legs, I needed to combine the two views, although they do mention that "The PDF version of this pattern includes bonus pattern pieces for interchangeable leg shapes with both rises." I cut the paper pattern to size 8 and then overlapped the two front pieces and back pieces so the crotch and hips matched, checking the grain lines were parallel. The photo below shows the two front pieces laid on top of each other.

When cutting this out, I noticed that the stovepipe leg was very slightly smaller than the skinny version towards the top of the inseam.

I decided to follow the stovepipe version here, by folding back the skinny leg underneath. The first photo is where I cut around the edge of the skinny piece, the second shows the stovepipe piece then cut.


Interfacing
After reading the post on the Closet Core Patterns website about prepping and cutting the Ginger Jeans, the advice was not to interface the waistband if you wanted it not too stiff. My denim had quite a bit of stretch and after basting it together, I could see that the waistband had a lot of give. Becca's advice was to interface both the waistband and lining, and so I cut these additional pieces in interfacing.

Having basted the jeans together to check the fit, I then unpicked the waistband to fuse the interfacing. At this point I realised the denim waistband had stretched by 1 cm at each end, just from trying them on. I trimmed the pieces back and then interfaced them.

Construction
Since I made these jeans in a workshop, there was more of a time constraint than if I was doing this at home. This meant I didn't capture as much detail of the construction as some of my other reviews. I also didn't have to reference the instructions much at all, as our tutor Becca was on hand to explain every step. This is a huge advantage for me on such workshops. Figuring things out for the first time by myself would likely have taken much longer with lots of research on various sewalongs and videos. Once you've been shown, it would be a little easier next time when reading the instructions.

I wasn't sure if stretch denim needed any special type of seam or thread but I was reassured that it can be sewn up in pretty much the same way as rigid denim, just with a little care not to stretch it while sewing.
Zip fly
For this part, I relied heavily on Becca's instruction as it was my first time sewing this, and I was really pleased with the result.

After sewing around the fly topstitching guide, you are then guided to sew the second line of topstitching inside the first. This would have meant me catching the zip and so I stitched it outside instead.

Topstitching
If you don't enjoy topstitching, jeans is not a project for you! Luckily I do enjoy it, but I admit that I was nervous of doing this under the time constraints of a workshop. This turned out to be a very good thing in fact, teaching me that perfection on topstitching was not necessary, and that it would soon become something I didn't give another thought to. I used Gütermann denim thread 2040 provided at the workshop.

The photo below shows some slightly wonky topstitching that I wasn't entirely happy with and would have unpicked and re-sewn if I was at home. However, I wanted to progress as far as I could within the two days so I left it. As I continued, it ceased to bother me and I was merrily on my way telling myself that nobody would notice, and if they did, well it didn't matter. I made a pair of jeans - how cool is that!!

Don't get me wrong - the next time I sew jeans I will definitely strive for neat, straight parallel lines, but it was great to see that I could sew it pretty fast, let some dodgy bits go, and that I would still be very proud to wear these. I didn't redo any of the topstitching, except on the one occasion I came off the fabric completely.
I also forgot to change to the longer stitch length when topstitching the yoke, so just carried on with the smaller length here (2.5mm vs 3.5mm elsewhere).

The time constraint also meant accepting a little bit of untidiness on the insides. I often like to take extra care with French seams, binding, neat overlocking etc. but again, it was great not to get hung up on this. It was certainly neat enough and serves its purpose of not coming undone in the wash.

Buttonhole and button
I sewed a keyhole buttonhole on the automatic setting. Once home, I added a dab of Prym Fray Check just in case. A very very minor detail but when attaching my button, I forgot to check which way up it was so the design doesn't sit the right way up.

Rivets
At the workshop I was able to use the Prym Revolving Punch and Vario Pliers for the first time to attach the rivets. This was much easier than using a hammer as I did for the eyelets on my Stella Hoodie. It was tricky placing them on the outer side of the front pockets due to the pliers having to go past a larger bulk of denim, so I didn't add any to the back pockets.

This was as far as I'd got in the workshop, with just the belt loops and hem left to do.
Belt loops
The instructions guide you to fold the ends of the belt loops under by 13mm. Since there was a lot of bulk of denim, I couldn't really rely on a sharp press to guide where this was, so marked it with a Prym AquaTrick Marker which just needs a dab of water to remove. I marked the underside at 13mm, so I could line this up with the topstitching on the top of the waistband.

After folding it over and pressing it, I marked the stitching line again to match the topstitching on the waistband.

I marked the right side of the belt loop to press it under at the other end, and then backstitched a few times to secure the bottom end.


Hem
When hemming the jeans, I used a hump jumper to help with the bulky seams.

Since there was a lot of fabric at the side seams once the hem was folded under, the pressed hem had a tendency to come undone while topstitching it in place. This meant that I didn't always catch the second fold.

I handsewed a slip stitch to secure this. You may notice in the photo above that you can see the top stitching thread showing on the underside. I was using my recently acquired vintage Janome sewing machine for the first time and this shows I hadn't got the tension correctly set.
Summary
I absolutely loved this project. Sewing my own pair of well-fitting jeans is incredibly satisfying. I am so glad I joined a workshop for this as I found the idea of sewing jeans a little intimidating. Having now gone through the process, it's not nearly as scary as I thought, taking it one seam at a time.


What I love
All that yummy topstitching :)
The great fit thanks to the workshop and stretch denim. This fits the best of all my garments so far. Where I would generally tweak the fit slightly on each future iteration, I can't say there's anything I would change about this one.
Comfort factor of the stretch denim.
The high-rise is not too high and I feel looks in proportion on me.
What I would change
As mentioned above I may leave the hemming for later on a future version to ensure it didn't shrink too much after washing a few times. (At the time of writing I haven't washed them so can't comment on the extent of shrinkage just yet).
I would consider making the front pockets longer to fit my smartphone.
What I discovered
This experience served to reinforce how much I value workshops for the expert guidance. Asking What do I do next? and then being shown is something that makes the whole process so much smoother and streamlined. There are often techniques that the tutors would recommend for a better result, that differ from the instructions as they are designed to make it an easier process for as many people as possible, but it's not always the best way.
That I can let go of needing the topstitching to be perfect :)
That it is possible to sew a project in a fairly short space of time if you dedicate solid stretches of time to it and don't unpick every seam that didn't go perfectly.
Stretching myself on a project does wonders for my learning and love of sewing.
Find me on Instagram, Facebook, YouTube, Bloglovin' or scroll to the bottom to subscribe to my newsletter which is published every month.
Links
I have no affiliations, I'm just a keen buyer and user. A UK supplier may be linked, please try to source items from your favourite independent stores.


Thank you for such a thorough review! Your jeans turned out so great! I think we all need to take heed on your "Discovery" ending and remind ourselves of these notes from time to time.