
Sienna Maker Jacket
- MingMakes
- Apr 30, 2023
- 9 min read
Updated: Mar 6

This jacket by Closet Core Patterns was on my to-sew list (admittedly with hundreds of other patterns) and I happened to come across a post advertising a course with Lynda Maynard to sew this up. You can read my review of the class itself here.

It was a big leap in complexity compared to anything I’d sewn to date. By this point I had sewn probably less than 20 garments, several of which were part of my journey in learning to sew from Tilly Walnes’ books Love At First Stitch and Stretch! I knew this course and project would be very advanced for me, but I was prepared to be the newbie of the group.

I signed up to the course to push myself and learn quickly. Since I can’t dedicate a lot of time to sewing I want to learn from experienced teachers early on, not on my 5th jacket. I was totally up for the challenge and there were many firsts on this project for me.

Fit
My measurements matched size 4 closely but this was too tight so I ended up cutting size 6 and made some adjustments, mostly for the gaping front neckline. I also lengthened the jacket by 4cm.
Since time was a little tight before starting the course, I didn’t make as many adjustments as I normally would. I detailed all my adjustments and toiles in this separate fitting post, including further changes I would make next time, and sleeve and collar adjustments I made during the construction process.

Fabric
I had some upholstery fabric that I was planning to use for this project but as the course unfolded, I thought it might be a bit too thick and I didn’t want to make things more difficult than needed on my first jacket. I ordered the 12oz (410gsm) organic sanded twill in ecru from Merchant & Mills instead.

I don’t have any experience in ordering fabric that is this heavyweight, so it was a relief when it arrived that it seemed just right for my project. I went for a neural cream shade as shopping online can be a bit tricky to gauge colour, and I didn’t have time to get a sample. It has a beautiful soft brushed finish on the right side.
I put it through two cycles of washing at 40 degrees and tumble drying hot, and it survived perfectly well. I pretty much wash all my fabrics like this so it can go in the wash with everything else.

Cutting out
When cutting the fabric out I folded it with the selvedges together and was about to cut into it when I couldn’t ignore what seemed like a slant in the cross grain lines on the wrong side. When I looked closer, I could see the cross grain more clearly and when trying to fold the fabric perpendicular to this, realised it was quite far off. I decided to go with it and cut my pieces at what seemed like a bizarre angle to the selvedge.

Once I’d cut everything out, I had used about 0.5m less than the recommended length needed with some single layer cutting.
Seam allowances
The pattern’s seam allowances are 1.5cm or ⅝” unless specified, so they do vary depending on which seam it is, some being 1cm or ⅜”. Lynda recommends making all seam allowances 1.5cm to make it easier to remember and to handle the fabric. Thankfully she had put together a video describing all the places where this was needed.


Interfacing
By this point I hadn’t used many different types of interfacing, just light or medium fusible. I went onto the Vilene website and picked H140 for this project since it was described as “For the fusing of front parts on coats and longer jackets and small parts susceptible to distortion. Suitable for light- to mediumweight fabrics.”

Lynda is keen on sew-in interfacing and favours silk organza, but it wasn’t something I was familiar with and I didn’t have enough time to research this before starting the course. To reduce bulk, I trimmed the seam allowance off the interfacing, using red Saral transfer paper and a Clover double tracing wheel to mark it.
Photo 1 shows two layers of interfacing with two layers of transfer paper between, ink side towards the interfacing.
Photo 2 shows the interfacing layers lined up, and using the double tracing wheel to mark the seam allowance at 1.5cm.
Photo 3 shows the marks created, ready to cut along this line to remove the seam allowance.


I have put together a separate blog post and video on how to use this paper and tracing wheel here.

Construction
I haven’t always stay stitched before on lighter weight fabrics, thinking I may be stretching the fabric in the process, and just trying to handle the pieces delicately. However I did on this as the stability of this fabric meant minimal distortion during the staystitching, and I knew that I’d be handling this heavier fabric a lot particularly around the neckline when attaching the collar pieces.

Pockets
Lynda showed us 3 types of pockets - unlined, lined and handmade. The handmade one was beautiful and I will keep it in mind for another project, but for now the lined pocket appealed for a relatively simple smooth finish. I have written a separate post about how I the lined pockets here.


Seam finishes
I used flat felled seams on the shoulder having never tried this before, and thinking it would help strengthen it. It worked just fine but I should have allowed a larger seam allowance to make it a bit easier.

I did Hong Kong binding on all the other seams including the armhole, and it made for such a beautiful finish on the inside. I used Liberty cotton lawn left over from my first Sagebrush Top, the same fabric that I used to line the pockets.


Lynda had suggested using double-fold bias binding and sewing it around the armhole in one go. I made some bias binding having been just gifted a Simplicity Bias Tape Maker by a local sewing teacher who no longer uses it. The video below shows how it works.
The machine worked beautifully but I found that the ¼” width I made was too narrow to wrap around the seam on this heavy weight fabric. I could have cut wider strips but instead I did a Hong Kong finish using what I already had, using this technique as I had on my Mimi blouse to get the correct length of binding.

Belt and loop
I love the channel stitching that Lynda recommended, not just for the sturdiness but it looks amazing too.


The belt is awkward if wearing the jacket undone as the free end is long. I have seen others either put it into the pocket or tie it round the back and secure it with the D-rings.

This fills the pocket and can leave the front gaping open a little awkwardly with so I may consider adding two thread loops on the inside having seen this blog post by Irene's Studio. I also really liked her second version with belt loops and a tie belt.

Collar
As mentioned in my fitting post, the collar sat quite a way from the back of my neck on my toile but after using a smaller seam allowance to give more room for my rounded back, I got a pretty decent result on the finished jacket.


Lynda suggests lots of handbasting, and I found this particularly useful when putting the collar together. It gave me much more confidence with the finished result because it was essentially half sewn already. It gave me an opportunity to check the collar looked OK before sewing it, and it’s much easier to handle in the sewing machine than with pins.


With all those thick layers to baste through, I wondered if it was finally time to invest in a thimble. I initially bought a Prym silicone one but couldn’t get used to the plasticky feel of the thimble head. I then tried a Clover leather one and much preferred the tactile feel of this. It helped a great deal when basting the belt/loop to the front of the jacket where there are up to six layers.

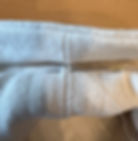
Since I’d added a twill hanging loop I decided to anchor the collar here with a few stitches, to attach the undercollar/facing piece to the back of the jacket. I hand stitched a small section around the hanging loop between the two pins in the photo below, stitching in the ditch between the facing and upper collar.

The stitching was visible on the back but wouldn’t be seen under the collar.

I changed the position of the roll line having had issues with the collar sitting away from the neck. I played around with the roll line for the best result and decided to place a few stitches to help hold it in place on the underside of the under collar. If you do this, just remember to do it after the topstitching (ask me how I know!).
Sleeves
I left the sleeve hemming for the end so I could check the length on the finished garment. Once pinned in, I hand-basted the sleeves as I find it tricky manoeuvring it in the machine with all the pins. Having done quite a bit of hand-basting by this point at Lynda’s suggestion, I knew it was time well spent.

It also meant I could check the fit. As mentioned in my fitting post, I was aware my arm fell more forwards than the pattern was drafted for, creating some wrinkles at the front of the upper arm so I rotated the sleeve and this looked a bit better.
Hem
Consistent with the rest of the project, the hem had a Hong Kong finish too which I think looked lovely. The instructions guide you to fold the hem up and sew, but this leaves the bulky seams on show at the bottom of the front edge and back slit.

One of Lynda’s videos showed how to enclose the seams inside, essentially turning it inside out, sewing along the hem line and then turning it back out. However the extra professional detail she added was making sure the seam of the front edge was still sitting just to the inside. It was many little details like this that really made the course worthwhile.

Topstitching
I basted the facing in place to help with the topstitching. Linda suggested doing two rows on the hem, sleeves, and to secure the facing. My two rows of topstitching on the pockets were fairly close together and I thought it might look a bit much to repeat this on all these areas and so I just did a single line of topstitching. I followed Linda’s suggestion of using a walking foot due to all the layers.

For securing the edge of the facing, I wanted it as straight as possible as it would be visible on the front and so I used a rectangular plastic lid on my machine secured with washi tape to act as a seam guide. I picked this tip up from Johanna Lundström of The Last Stitch who uses a Lego block with Blu-Tak.

I used this for the long straight section of the front, then followed the Hong Kong binding edge for the remainder.

There are more details and photos of the topstitched pockets in the separate post here.
Things I would change next time
Having been guided through this project, there wasn't much that didn't go to plan. Things I might change would largely be fitting adjustments (more details in my fitting post):
Correcting the bust point which was too high and too lateral on me.
Checking the horizontal balance lines. There was some raising of the front balance lines and hem. Adding length above the bust may have corrected both this and point 1.
Rotate the sleeves as my lower arm falls more forward than the pattern
Consider sizing down on the sleeve (they felt a little wide)
Reduce collar pieces according to the amount taken out of front gaping neckline
Do a rounded back adjustment
Consider reducing width of the back bodice
Consider shortening the length of the jacket slightly (not sure if the proportions looked right on me so I would experiment with this)


Construction:
I may add belt loops and make it a tie belt to avoid the long length when left undone.
I’d consider drafting a lining, and particularly so if using the upholstery fabric. Lynda's course includes instructions on how to do this.
Summary
I was finally done and am so proud of the result. I can’t say that I even found it that difficult, but I know for sure that this was because I was completely led through the process by Lynda’s course. When someone shows you how to do it in a certain way for a more precise result, it makes it feel easy to get a professional finish.

I would sew this again and possibly use the upholstery fabric I had initially bought or try wool. I’d also consider the shorter View C for a different style, and particularly since I have Lynda’s guidance for this view as well.

Find me on Instagram, Facebook, YouTube, Bloglovin' or scroll to the bottom to subscribe to my newsletter which is published every month.
Links
I have no affiliations, I'm just a keen buyer and user. A UK supplier may be linked, please try to source items from your favourite independent stores.


