
Fitting the Elodie Dress
- MingMakes

- Mar 5
- 6 min read
Updated: Apr 13

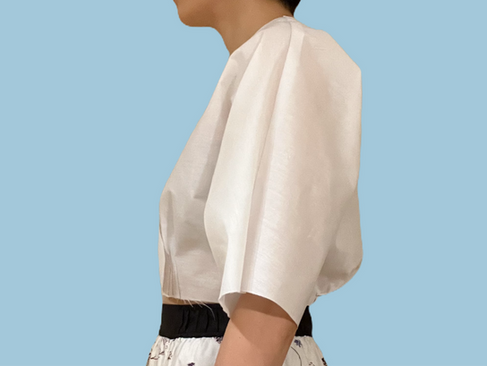
The Elodie Dress by Closet Core Patterns has a fairly loose fitting wrap bodice with blouson effect, cinched in at the waist with a belt. I had seen plenty of examples with minimal adjustments and they all looked great, particularly with drapey fabrics on the loose wide sleeves. These dolman style sleeves often create folds to the side of the bodice and I had seen this to various degrees. For my own version I didn't want a lot of excess fabric here as I felt it would overwhelm my frame.

As usual, I made a toile of the bodice. I have made two other patterns from the Closet Core Patterns range – the Kelly Anorak and Sienna Maker Jacket, both of which I started with a size 6 and made adjustments from there and so I cut the size 6 in the Elodie Dress. I generally need a high rounded back adjustment and sometimes low rounded, but I just cut a straight size 6 in the bodice to begin with. My review of the pattern itself can be viewed here.

My main adjustments were:
Reducing bust volume
Reducing excess fabric at the back
Increasing underlap of the skirt and therefore bodice (detailed in a separate post here)

First toile


Observations
The waist of the dress was too high. The toile came to my natural waist but this still included the 1.5cm seam allowance
It was too tight around my waist
There was too much volume for my bust
The bust apex on the pattern was higher and more lateral than my own
There was quite a lot of excess fabric around the back
The shoulder seam was too far back
Here is how I dealt with each of my observations:
Alterations
Waist too high
I lengthened the bodice by 1.5 cm. To ensure the underarm curve was the same on the front and back, I redrew the curve on the back piece and then traced this onto the front.
At this time, I had forgotten to account for the height of the waistband, and so I probably didn't need to do this adjustment by as much.
Waist too tight
Bust volume too large
Bust apex too high
I felt these three points could all be addressed by changing the pleats. For points 2 and 3, I could address these by reducing the overlap of the front pleats. Having looked at Closet Core's guidance on doing a small bust adjustment, they recommend a slash and overlap technique which keeps the pleats the same but reduces the space between them.

To me it felt like this wouldn't do enough, as it's the pleats which create the volume (similar to a dart), and they would have remained the same. I decided to reduce each pleat by 1.25cm, which also gave me additional width around my waist.
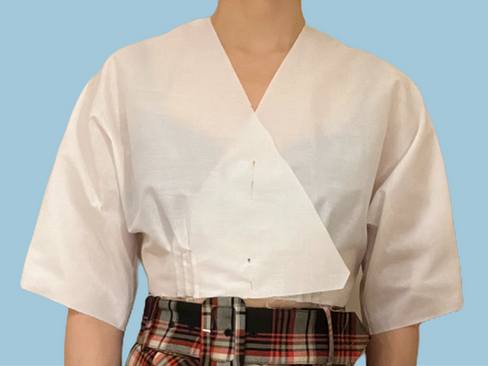
Here are the steps I took to reduce the pleats and move the bust apex:
Marked my actual bust apex on the pattern.
Drew a line up through the centre of the middle pleat up to the original bust apex where it points.
Drew a line parallel to this through my own bust apex.

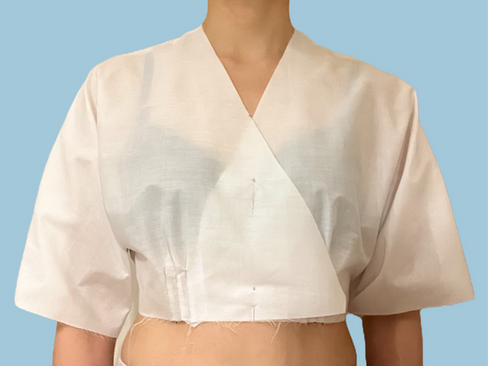
Each pleat was 2.75 cm at the base, and I decided to reduce these to 1.5 cm. Starting with the middle pleat I drew this in as a dart up to my bust apex. I reduced the sewn length of the pleat by 1.5 cm since my own bust apex was lower than on the original pattern (shown in the photo below by the two short horizontal lines).

I repeated this for the two other pleats. The centreline of the original pleats were 5 cm apart. I reduced this distance on mine to 3cm since my bust and therefore pleats were smaller. The angle of the new pleats was a bit of guesswork. On the original pattern it seemed as if the legs of all 3 pleats when extended crossed a little lower than the apex and so I roughly replicated this.


Since the adjustment to the pleats now reduced the circumference of the waist, I adjusted the length of the front waistband and front skirt to match by truing the waist seam. A further adjustment was made to these pieces after increasing the wrap coverage.
Excess fabric at the back
The dress is meant to have a blouson effect at the back so I left the back pleats as they were. However there was just a lot of volume around the back of the shoulder and upper arm. I had a similar issue when fitting the Saguaro Set top and so tried pinning it out along the top of the shoulder in the same way to see if this would work.

Here is how it looked after pinning.

This was looking better, so I transferred this to the paper pattern piece. In order to avoid having to adjust the neckline or facing pieces, I only sloped the shoulder 1.5 cm (the neckline seam allowance) in from the edge.

At the end of the shoulder, I then made this line parallel to the original pattern, so that the arm could still move freely without raising the sleeve too much when my arms were raised.

I then traced the same adjustment onto the back bodice piece.
Shoulder seam too far back
Having made several other adjustments, I didn't do anything further for this at this point so I could assess it on the toile first. If it did need adjusting, this was relatively simple and wouldn't require another toile.


Second toile


Observations
The waist was at a better level but needed to be dropped even further. In the photos above, I wore it with an elasticated waisted skirt which sits comfortably at my waist. The toile just about reaches this so I needed to add the seam allowance, but had in my mind that the fabric I'd be using was more drapey and would be pulled down by the weight of the skirt. However, see my note at the end of my post in Final thoughts regarding position of the waist.
The waist was no longer too tight.
The reduced volume for my bust seemed more appropriate.
There was still quite a bit of fabric around the back of the upper arm but to some extent this is inevitable with this type of sleeve. I also knew that it wouldn't be so obvious in my drapey fabric and so didn't adjust this any further.
The shoulder seam was still too far back.
Alterations
For simplicity, I tried adding 1cm to the entire back shoulder seam to bring it forwards. I could see that the front was raised slightly and I wondered whether this would help that too. I tried this on the toile by unpicking the shoulder seam, and sewing it back with a smaller seam allowance on the back.


This didn't seem to make any difference to the shoulder seam as it still kept wanting to fall to the back off my shoulder, and only increased the volume of fabric at the back. I therefore reverted to the previous version.
Having read the Closet Core's useful post on Fitting Adjustments for the Elodie Wrap Dress, I wanted to try their suggestion for reducing some of the blousing volume at the back.
I reduced the pleats by 1 cm each, therefore increasing the waist measurement by 2cm on each side (4cm in total). I compensated by taking in the centre back seam and blending this towards the top, which meant the back waistband piece didn't need adjusting.


I was happy with this and also went on to extend the left front bodice and skirt piece to increase the wrap coverage of the skirt, as is detailed in a separate post.

Final thoughts
When adjusting the length of the bodice, I hadn't accounted for there being a waistband, thinking the bodice was attaching directly to the skirt. This meant I probably didn't need to lengthen the bodice quite as much, maybe by 2cm instead of 3cm.
For adjusting the shoulder slope and sleeve, I'd consider continuing the line straight from the shoulder all the way down to the sleeve hem, and then adjusting the underarm seam so it was parallel. This may help reduce some of the flare from the sleeve hem. It may also create some restriction of movement when putting my arms up but probably not by a great deal.
To read my full review of the pattern, click here.
Find me on Instagram, Facebook, YouTube, Bloglovin' or scroll to the bottom to subscribe to my monthly newsletter.
Links
I have no affiliations, I'm just a keen buyer and user. A UK supplier may be linked, please try to source items from your favourite independent stores.


Thank you for always sharing so much technical details. From my perspective the sewing community keeps changing to a more IG worthy, beautiful picture show-off. And I am so happy that you are a great exception.
Tina