
Fitting the Avid Seamstress Culottes
- MingMakes

- Nov 24, 2025
- 3 min read

I was fortunate that these culottes needed little in the way of adjustments to create a great wearable garment. You can see my pattern review here where I talk about making a quick toile under Lisa Falconer's guidance (the Avid Seamstress herself).

I made a size 2 (UK 10), grading to size 1 (UK 8) for the waist and crotch. I love them and have worn them a lot. However, I really wanted to learn more about fitting trousers by working with these a little more.
There were two issues that I wanted to resolve on my next pair:
The small folds either side of the front crotch.

The draglines at the back.

I'd had contact with fitting expert Sarah Veblen through her mentorship programme for several months, and when that ended I continued with some online consulting. During one of our Zoom meetings, she gave me some guidance, so here is what I tried.
1. The small folds either side of the front crotch
There was too much width in this area and so I pinned down centre front to see whether this would improve it.


I basted this in to get a more accurate view of what it would look like.

Here is how it looked basted in, with the before and after comparison view. I experimented with pinning/basting different amounts or different curves but this seemed to look the best. It's not a dramatic change but an improvement I feel. It also seemed to take some volume out of the pleated area which helped.


Pattern work
This is how I transferred the new crotch curve to the paper pattern.
a). Pinned the crotch to the paper pattern as accurately as I could. Then slid some Saral transfer paper underneath and used a tracing wheel over the basted line.


b). Neated this up with a curved ruler.

c). Cut the pattern to leave this with a 1cm seam allowance as the pattern dictated, using the Clover pattern cutting guide.

d). Sarah advised me that with this adjustment, the front crotch seam would now be longer, and so it could be shortened where it meets the in seam to compensate.

This was a relatively straightforward adjustment to sew into the current pair of culottes and so I did this, although without the in seam adjustment in point d) above. Here are the before and after views.


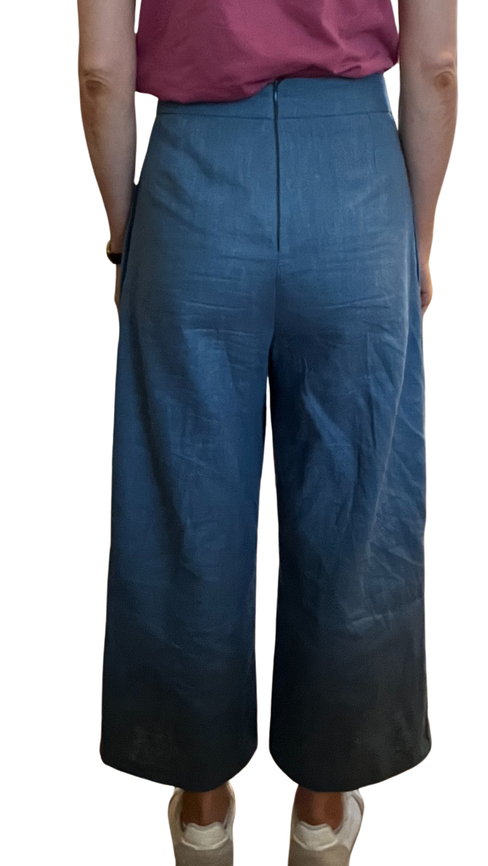
2. The drag lines at the back
I tried pulling the trousers up at centre back and this looked a lot better.


It was hard to precisely measure how much the adjustment was for but I estimated 1.5cm.
Pattern work
I took 1.5cm off the top of the centre back (to the left of the photo), going to nothing at the side seams.

When pulling this up, it did start to feel a touch tight around my buttocks, across the horizontal area indicated between my thumb and finger.

I assumed this was because I had raised the centre back and so I needed more space around the seat to compensate, as I was effectively giving myself a wedgie. I added more width to the base of the back rise and then deepened the seat. The amount of the adjustment was a bit of guesswork, and I would just see how this fit on my next version.

Hem
I was a little unsure about the length and whether it was in proportion to my height of 5'4". I decided to shorten the hem by 2cm which I think looked better. Since the culottes are quite wide at the hem, you don't see the feet as much and so they have the illusion of being longer than they actually are.
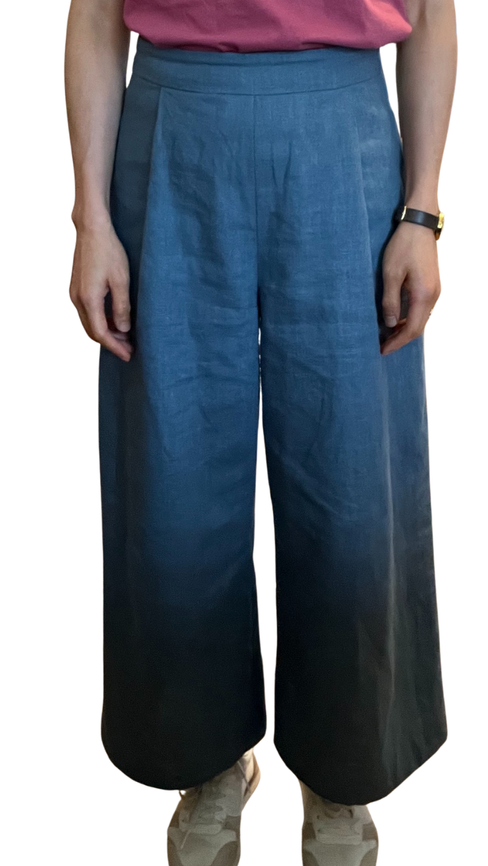
Finished culottes
Here are photos of the finished culottes from all views. The second of the photos of the back is to indicate how it might look with the adjustment of raising the centre back. You can see my review of the pattern itself here.


Find me on Instagram, Facebook, YouTube, Bloglovin' or scroll to the bottom to subscribe to my monthly newsletter.
Links
I have no affiliations, I'm just a keen buyer and user. A UK supplier may be linked, please try to source items from your favourite independent stores.
Related blog posts


Comments