
Fitting the Saguaro Set trousers / pants
- MingMakes

- Jul 19, 2022
- 4 min read
Updated: Oct 17, 2022

I was smitten with the Saguaro Set by the Friday Pattern Company since it was released, considering it perfect for a cruise I had coming up. This was the first pair of trousers I tried fitting (as a Brit, I can't get used to calling these pants!), having only made a pair of pyjama bottoms before without any modifications. I was pretty sure I could easily get away without any fitting since they were loose-fitting with an elasticated waist, but in anticipation I’d watched the Craftsy course called Easy Fitting the Palmer/Pletsch Way: Pants, and wanted to make use of the information I’d learned.

It was a great course that went through a few examples of the whole fitting process, and by the end it didn’t feel quite as daunting as I’d imagined. I used their tissue fitting method which worked really well for me.
This is a post just about my fitting process. My full review of the pattern and construction can be found here.

Sizing
My waist and hip measurements put me into size M so this is what I traced. I added an extra 3cm to the length on the pattern piece because:
I wanted them to finish at full length rather than skimming the ankle.
In the Palmer/Pletsch course they mention that when tissue fitting, the pattern pieces should touch the body at the crotch since fabric would have more drape and so once transferred, would fit just nicely. However since the crotch is cut on the bias, this creates a little bit of stretch and so the trousers may need to be pulled up further to account for this, therefore shortening the trousers at the hem and so they advise leaving extra length.
Preparing for tissue-fitting
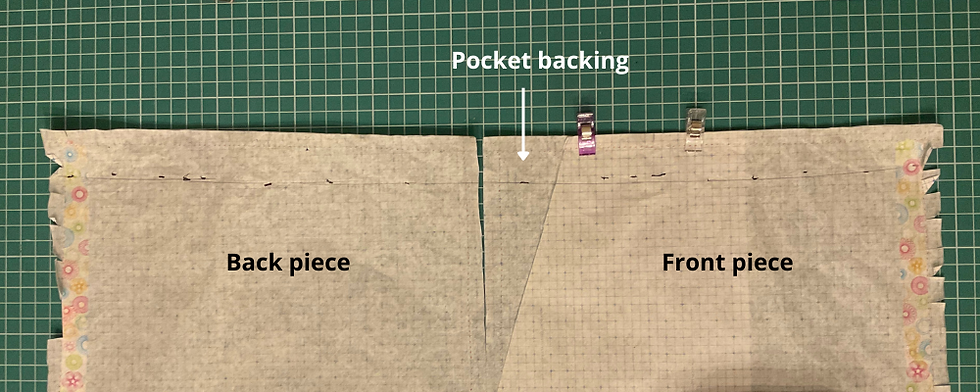
I pinned the pocket backing to the front piece to complete the front of the trouser piece lining up the notches, then pinned this to the back piece.

Here is the back view, the back piece curving as it is wider than the front.

Waistband
I cut a piece of the 50mm wide elastic bought on Etsy that the pattern uses for the waistband, and safety-pinned this together to hold it round my waist, at the height I wanted the waistband to sit. I had it so the lower end of the elastic covered my belly button and it felt comfortable here.
Tissue-fitting
I pulled up the tissues pieces until they touched the crotch and then held them at whatever angle meant they were straight down my leg with my foot in the middle of the trouser leg. I also made sure the side seam was straight down.
I pinned the pattern pieces to the waistband at this level. Since the waistband is elasticated, there was a bit of scrunching involved to pin it to the waistband. It seemed to fit nicely around my hips. My cat seemed to find the process intriguing :)


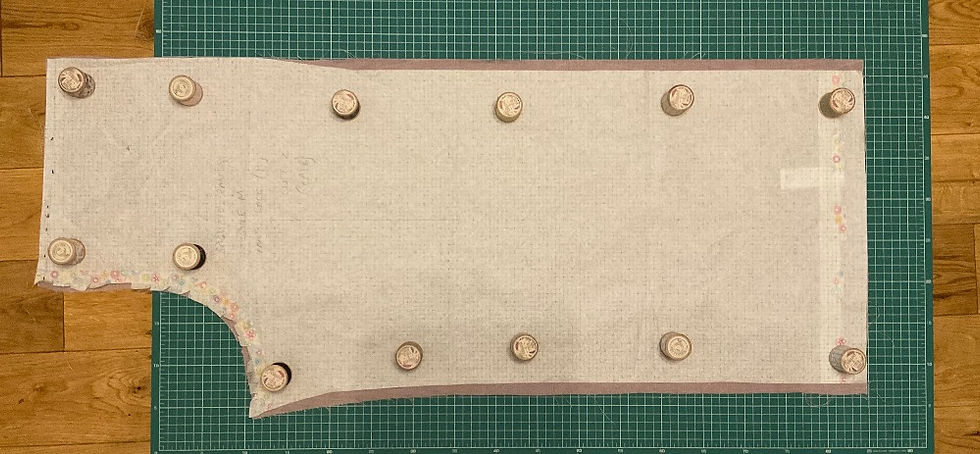
Once happy with how it was sitting, I marked the bottom of the waistband on the pattern pieces to represent the seamline between the waistband and front/back pieces. These marks are indicated with the black arrows below.

After taking the pattern off, I roughly joined these marks with a French curve ruler.
I then used a double tracing wheel (blog post with video here on how to use it) to add the 1cm seam allowance and then cut along this line.


I moved the wax paper under the front piece to mark the pocket backing.

Mistake!!
In the fitting adjustment above, I removed some height from both the front/back pieces and the pocket back piece, but forgot to do the same with the pocket facing which was therefore longer. I only realised this having sewn the pocket facing to the front piece already. Thankfully I had enough fabric to recut the pocket back piece as a longer piece, and in fact I this worked out better because it meant I kept the original length of the pocket, which otherwise would have been shorter. The change in the curve at the waistband was not significant enough to make this an issue.
Fabric fitting
At this point I was confident enough to cut into my fabric without a toile. I sewed the waistband to the front and back pieces and the pocketing backing to check the fit.


I was happy with the fit but the legs felt quite voluminous so I graded down to size S below the pockets to avoid having to change those pieces as well, plus I didn't want to lose any width around the hips. Here is the new shape of the back piece on the original fabric piece which I then cut. I repeated this with the front piece.
Hem
Having added 3cm to the length, I hemmed it up by 2.5cm. The instructions suggest folding it up twice but I wanted to avoid bulk so I overlocked the edge and handstitched with catchstitch for an invisible look.


Finished trousers
Here is the final result. The wind caught the trousers in the photo of the back so they look wider than otherwise. They are very comfortable and the crotch fits just right. In these photos, I have paired it with a simple t-shirt.


Find me on Instagram, Facebook, YouTube, Bloglovin' or scroll to the bottom to subscribe to my newsletter which is published every month.
Links
I have no affiliations, I'm just a keen buyer and user. A UK supplier may be linked, please try to source items from your favourite independent stores.
Related blog posts
My review of the Saguaro Set top (includes photos of the full set worn together)


Comments