
Liberty Zina Wrap Skirt / Simplicity 8606
- MingMakes

- Dec 19, 2021
- 9 min read
Updated: Mar 7, 2023

I love floaty skirts and I love prints, and so this Liberty Zina Wrap Skirt pattern really appealed after seeing their photos. With a cruise booked for next summer, I didn't need much persuading. Not only that, I was about to have a relaxing holiday in a lovely rented house in Wales and the thought of sewing something up there that didn't need fitting adjustments got me all excited.
After a bit of searching, I couldn’t find any reviews online from anyone who had sewn this. I like to read a few before embarking on a new pattern to learn from their experiences. However, the moment I finished the skirt, those very helpful people on the Patternreview.com forums were discussing the Liberty patterns being reprints from the Big 4, and I realised this skirt is the Simplicity 8606. Ah, that explains a lot!

Fit
My waist measurement meant I was between sizes 14 and 16, of size range 6-22. This put me into the larger of the two sizing brackets, which means it has fairly limited sizing. I went with size 14 after measuring the waist on the actual pattern pieces to see what was more appropriate.
Fabric
I used Art Gallery fabric Summerdress Dreams Flare in Rayon bought from Lamazi Fabrics. This was my first time using rayon challis and it was so soft and drapey, perfect for this type of skirt. It wasn't sheer either which was a bonus. I can definitely see me using more of this type of fabric in the future.
Construction
Cutting the fabric
Having not found any reviews before I started, it looked like I was going to have to make all the mistakes myself. Indeed, I cut the first piece in my beautiful fabric and realised that I had already made TWO mistakes!
Mistake 1
I had 150cm wide fabric and was following the cutting layout for the 115cm width 🤦🏻♀️
Mistake 2
In this layout they asked for the fabric to be doubled up ie. cutting in 2 layers but not folded so the pieces would be the same way up. I didn’t read this correctly or realise what I would end up with, cut with the fabric folded crosswise so I cut one back piece upside down. Thankfully I don’t think it’s noticeable on this fabric, but definitely a face palm moment.

And so followed a bit of careful jiggling and planning to ensure I could cut the rest of the pieces in the remaining fabric, mostly involving single layer cutting. I wanted to attach pockets too and had enough spare fabric for this.
Mistake 3
The back flounce is cut as 2 pieces, a symmetrical pair and so the fabric is folded with one selvedge on top of the other. Fitting in the pieces was tight due to my earlier mistakes and so I cut close to the selvedge, which was fine because it would lie within the seam allowance. What I didn’t realise was that the selvedge underneath had a 3cm wide white strip containing the fabric info, and this ended up in the mirrored piece underneath. I had 2.5cm of this strip at its widest, where the seam allowance for this part was 1.5cm so it would show along the centre back seam.

The top part of the skirt was sewn by this point, otherwise I might have chopped this bit off and adjusted the other part of the skirt to match. As shown in the diagram below, I decided to make this centre back seam wider to hide the strip, and take off the equivalent on the other end, so that the top edge of the flounce was still the same length. This meant the seam allowance on one side was 2.5cm, and the other 0.5cm, making a total of 3cm, the same as two at 1.5cm.

In practical terms for French seaming the larger centre back seam, this meant sewing the first seam wrong sides together with a 1.5cm seam allowance, trimming this back to 0.5cm. Then putting right sides together and sewing with a 1cm seam allowance.
At the other end having only a 0.5cm seam allowance, this wouldn't be enough for a French seam but I still wanted it neat and enclosed. I had to remember that the front flounce that it would be attached to still had its original 1.5cm seam allowance. I decided to use this additional width to help enclose the narrow 0.5cm seam allowance. Here's how I did it:
Step 1 - Pin the seam in place
I pinned it in place to allow for 0.5cm seam allowance on one piece, 1.5cm on the other. This meant the raw edges were staggered by 1cm.

Step 2 - Stitch the seam
I stitched the seam using the 1.5cm seam allowance on the wider piece.

Step 3 - Fold seam allowance over and press
I pressed the wider seam towards the middle, about halfway between the seam line and the raw edge.

Step 4 - Fold over and press a second time
I folded this over again to meet the seam line and enclose the raw edge. I then pressed it.

Step 5 - Stitch in place and press
I stitched this in place close to the seam line, trying to make sure I didn't go over it and pressed it.

I was really pleased with the finished seam, showing no sign of the white strip.


Using a laser level to mark grainlines
I recently came across a superb tip on Patternreview.com about using a laser level to mark grainlines, as described in this video by Manecoarse. You put the laser level at one end of the cutting mat making sure the light runs along one of the gridlines. You then lay your fabric on the mat making sure the selvedge is also parallel to a gridline, or use the print on the fabric if it has one to line it up with the laser light. Then place your pattern piece on top, and it’s easy to adjust it so the grainline runs along the laser light.
I thought this was genius and it certainly made this project easier to cut out. They often come with a red light but I got one in green thinking it would stand out more, and especially because I would be unlikely to sew anything in that shade of green.

French seams
I decided to use French seams to keep it neat, and I felt the lightweight fabric could take it. I had also started this project while on holiday in Wales and hadn’t packed my overlocker which I might have used instead if at home. As I started sewing the flounces, it occurred to me that the intersecting seams between the skirt and the flounces could become quite bulky and I debated whether to abandon them at this point and overlock what I could when I got back home.
However I knew it wouldn’t be very neat without overlocking as you go along, so I just tried to have the French seams facing different directions when intersecting and this was absolutely fine with my lightweight fabric.

Anchored pockets

I decided to try anchored pockets which are in seam pockets that extend up and are sewn into the waistband for additional security and strength. Since my fabric was lightweight, I thought this would make them a little more sturdy. I used a pocket pattern from my Lilou Dress, which I based on the Clemence skirt pocket, just a bit larger. I lay this on the front piece of the skirt roughly where I thought might be a good position (6cm down from the top of the pattern).

The photo below shows the pieces above with a scrap piece of tissue paper on top (with writing and diagrams on). The skirt piece is at the bottom (outlined in black), then a pocket piece on top lining up with the side seam and 6cm from the top of the skirt piece, then some scrap tissue paper for me to trace the new pocket piece.

I then traced round it but extended it all the way up to the waistband.

Here are the two pocket pieces side by side.

I intended to use interfacing at the pocket openings as described in the Clemence skirt instructions and cut all the pieces out but by the time I came to it I had forgotten 🤦🏻♀️
I used French seams on the pockets too for which I used this tutorial by Bernina, and then this tutorial by the Curvy Sewing Collective for the final instructions for the anchored bit, which is just to baste both front and back pocket pieces to the front skirt along the waistline.

Starting / ending seams on lightweight fabric
Having spent hours unpicking a dodgy seam start on stretch lace in my last project of the Frankie T-shirt, I was determined not to make the same mistake again, so I used tissue paper under every start of a seam. After a few dodgy seam ends, I also used this at the end when backstitching.
Stay stitching
I didn’t do the stay stitching as I feel that in my hands I can end up distorting the piece in the process, and so I promised to the sewing gods that I would handle the pieces as gently as I could, and try not to let the pieces hang off the table or ironing board etc. I was slightly concerned with the amount of extra handling it required due to the addition of pockets and French seams (plus all the mistakes and adjustments I was making!) but it was absolutely fine and everything matched up as it should.
This also meant skipping the machine stitching of the inner curve of the flounces in Steps 3 and 4.

Adjusting length
In my very primitive mind as I started the project, I thought to myself that I’ll just adjust the length of the skirt at the end by reducing the depth of the flounce at the hem. It then dawned on me that this wasn't going to be a simple case of lopping a bit off the bottom since the ruffle was curved. I then let myself procrastinate for a bit before getting stuck into the mathematical jiggery pokery it needed, which my nerdy mind actually quite enjoyed 😆
Here's my full blog post describing the steps I took.

Hemming
I used my 4mm rolled hem foot for a really neat and even hem since it might be on show with the flounce flouncing around. I tried the method suggested in the instructions of pressing up by the full 1.5cm and then folding under, but my folding under wasn’t neat with this drapey fabric. Here’s my blog post with short video tutorial on using a rolled hem foot. I never fail to be amazed at the magical result this produces!


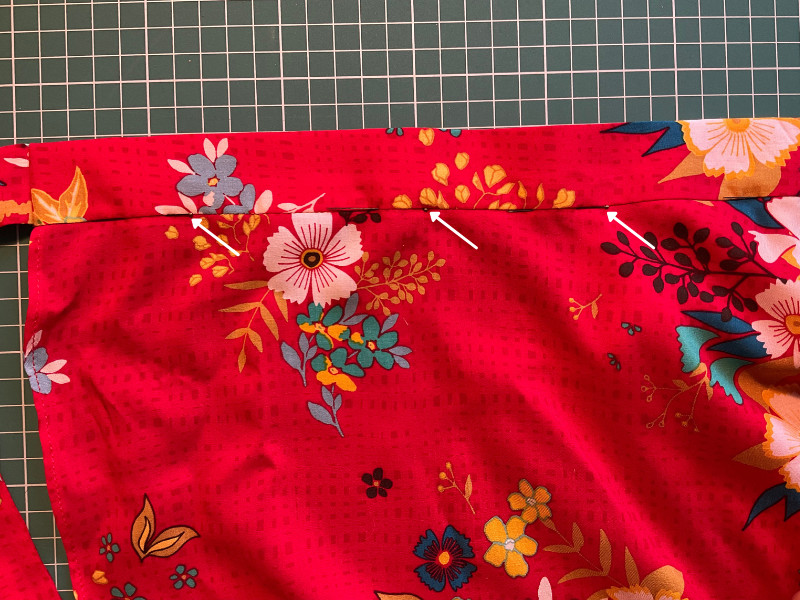
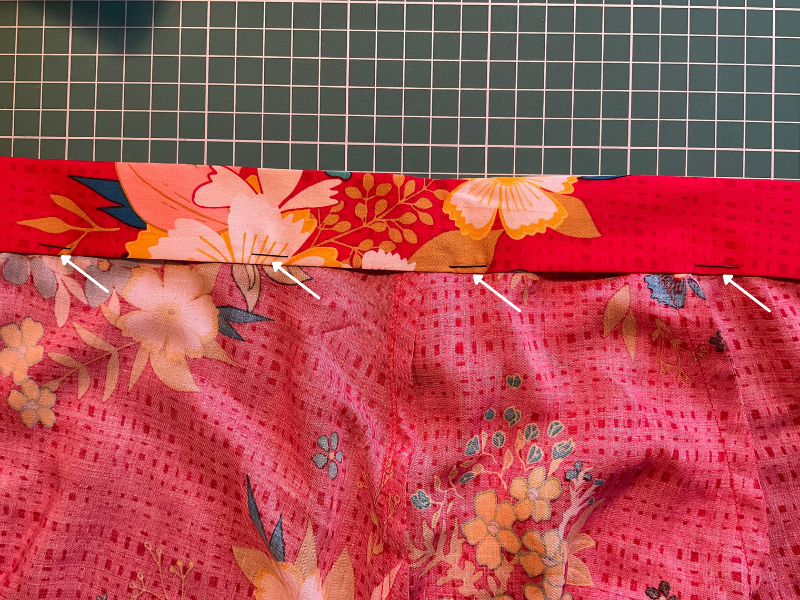
Waistband
Before stitching in the ditch to secure the folded over waistband on the inside, I pinned along the seam line to ensure I would catch the free end on the inside. The white arrows point to the pins since they're a bit hard to see on the photo.


I put tissue paper under the buttonhole while sewing it which worked really nicely but because of the very tight nature of the stitches, I couldn't pick it all out at the back. I suspect most of this will come out in the wash though, and if not, no one’s going to see it.

I sewed the labels on with leftover glittery gold thread from an embroidery kit. I thought this nicely matched the gold lettering on the side seam label. Having treated myself to the Kylie and the Machine labels advent calendar, I need to use up at least 3 on each project 😊


Levelling the hem
Having finished and excitedly tried it on, I realised the hem was a bit (OK, very) wonky and needed straightening out. Whilst I was looking up the tip on the Patternreview.com forums about using the laser level to align pattern pieces with the grainline, I came across another about using it to level the hem.
It made total sense and now I have another use for my new gadget. It's a brilliant idea, another Aha moment for me.

I have a mannequin double which made this easier, marking with pins the new level of the hem according to the laser light. I cut the excess off with a rotary cutter between 0.5-1cm below the level of the pins to allow for the rolled hem, and then tried to blend it in. This did make for a few dodgy joins with the existing rolled hem, but I was pretty confident no one would notice this all the way down at my feet.

Wrap overlap
Something I'm always very interested in where a wrap skirt is involved, is what's going to show when the wind blows. Here's a front on view of me with the front wrap piece held to the side. This has decent coverage as it's going to take a lot for the wind to blow the front piece that high.

Summary
I love floaty skirts so this is right up my street. The fabric is a lovely vibrant colour and beautifully soft. I can definitely see more rayon challis in my future. If sewing this again, I would consider shortening the skirt as well as the ruffle to make them more in proportion with each other. I would also leave the hemming until the end so I could check the length and level first. I was pleased to have learnt how to do anchored pockets and would favour this over simple in seam pockets for additional support from the waistband. I initially thought that this was just a summer item of clothing, but I do like how they’ve styled it with long sleeved knit tops and boots, for classic British weather :)

Find me on Instagram, Facebook, YouTube, Bloglovin' or scroll to the bottom to subscribe to my monthly newsletter.
Links
I have no affiliations, I'm just a keen buyer and user. A UK supplier may be linked, please try to source items from your favourite independent stores.


Comments