
Fitting the Stella Hoodie
- MingMakes

- Mar 13, 2022
- 7 min read
Updated: Jul 21, 2022
Welcome to another of my epic fitting journey posts. As always I learnt so much on this project, and each time I get a little closer to understanding how my body shape differs to the pattern. With this hoodie being described as 'easy-fitting without being too baggy', I was hopeful that I wouldn't need so much in the way of fitting adjustments. I came to realise this was just me in denial, and so the fitting journey began.
This post is just about how I fitted it, my full review is here.
This is the fourth pattern in the Tilly and the Buttons book Stretch!, following the Freya dress for which I needed a lot of adjustments. I documented my fitting process and got a wearable result but I felt the fit around the back and shoulders could be improved, and being from the same designer I anticipated coming up against the same issues. I was determined to improve the fit on this project.
Sizing
I decided to cut a straight size 4 to start with. This is how my body measurements compare to the size chart in centimetres:
| Pattern size 4 | Me |
Bust | 91.5 | 89 (upper bust) 86 (full bust) |
Waist | 76 | 74 |
Hip | 99 | 94 |
I went with the size closer to my upper bust measurement as garments are often tight for me around here due to this being larger than my full bust. My hip size was equivalent to size 3, but I went with size 4 knowing that I would wear this over some possibly bulky jogging bottoms. It would also be easy enough to take in if too roomy here.
I bought my toile fabric before the fashion fabric, and they had quite different properties, the toile fabric being less stretchy and thicker. This would at least mean my final garment would likely feel looser than tighter if anything. My toile fabric (Criss cross quilted effect double jersey - pale grey marl and raspberry) was on sale at £4 per metre from Fabrics Galore and was great quality. I would have quite happily have made a finished version in this if I had enough left over after chopping it up for my toiles.
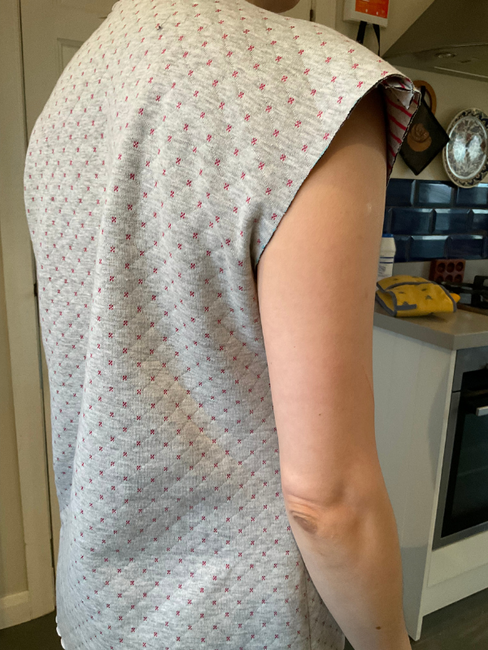
First toile
Here are photos of my first toile (the seam allowances had not been trimmed off around the neckline and armholes).


Fitting issues
The front looked pretty decent, the back looked nasty. Problems I noted with the back were:
More room needed for my rounded back noted by drag lines from the side seams pointing to my upper back.
Too much width in the back shown by the large vertical folds of fabric.
Shoulders needed widening. This toile included the seam allowances but I felt the seam should be roughly where the fabric ended for the dropped shoulder design.
Adjustments
Here’s how I dealt with them:
1. Rounded back
This was the same fitting issue to one I saw in the Freya Dress which I mostly solved by doing upper and lower rounded back adjustments (RBAs). My diagnosis was made by slashing across the toile where upper and lower RBAs would be made. The slash line separated easily and the drag lines disappeared, so I pinned in extra fabric to check.
Using my Freya Dress project as a guide, I did an upper RBA for 1.5cm (the maximum recommended by the Palmer/Pletsch method) and a lower RBA for 3.5cm. Again learning from the Freya Dress, I knew I needed a swayback adjustment too, especially due to the additional fabric from the RBAs. I pinned out the same as the total of the RBAs, 5cm.
This was now starting to look a little better.

2. Too much back width
The Freya Dress had a fitted bodice and so when doing my RBAs, I tried a method that would mean I didn’t need a centre back seam or shoulder dart, but tried to preserve the width as detailed in this post. Since it looked like I had excess width here on this project which was also more loose fitting with the dropped shoulders, I wasn’t so concerned with preserving width and so I simply cut down the fold line on the back piece. I didn’t do anything else at this stage to specifically reduce the width as I wanted to see how this looked first.
In the left photo below, the red dotted line indicates a straight line between the hem and neckline, and the red arrow points to the bulge created by the RBAs which I then cut off. The red line effectively is the fold line.
In the right photo, the pattern piece has now been cut along this line and the black arrow points to the swayback adjustment which added a small amount to the width at the waist, but I felt it was small enough to leave in for a loose-fitting garment. An alternative would have been to take this back off the side seam. I did not add any paper to straighten up the fold line, I just made a note to place the neckline and hem on the fold.


3. Not enough shoulder width
I followed this post by Tilly and the Buttons to widen the shoulder using the slash and spread method, adding 1.5cm.
Here are the front and back bodice pieces with the adjustments so far.

Second toile

I cut the seam allowance (SA) off the armholes to better assess the fit. The back still had the large folds of fabric but were a little better. I noticed that by raising or hunching my shoulders as shown in the photo below, the folds flattened out.

This made me wonder whether I needed a sloping shoulder adjustment and to lower the armhole, it felt like my arm was pinching on the bottom of the armhole. The photos below show the improvement by raising the arm.


At this point, I decided to ask for help in this thread on the PatternReview.com forums and had some very helpful responses. Suggestions included:
Forward head adjustment
Sloping shoulder adjustment
Placing a shoulder dart
Cutting a smaller size for the back
These all made sense to me and were worth a try. Here’s what I did:
1. Forward head adjustment
I tried this using this video from Alexandra Morgan. It was straightforward, creating an even spread across the back and an equivalent tuck across the front, but it didn’t do anything to address the vertical folds and somehow made the front look worse and so I zigzag stitched the back piece together again so I could continue using the same toile.
2. Sloping shoulder adjustment
I then tried the sloping shoulder adjustment but only on the back as the front looked fine to me and I didn’t want to change the fit of that. I unpicked the shoulder seam leaving a small bit attached at the neck, and then overlapped the back piece over the front by 2cm. I also released the top part of the side seam to mimic the armhole being lowered. This seemed to improve things:


Looking at the photos of the side view, it actually looked like the sloping shoulder adjustment needed to be done more on the front piece than the back, as the seam line looked more appropriate where the back piece finished. This may also be due to my forward shoulder and so this adjustment would take care of both together. Here is my pattern piece showing a dotted line where I cut for the adjustment on the front piece. The back piece remained the same.

This meant the armhole would be smaller on the front by 2cm. By this point, my brain couldn’t handle how to adjust the sleeve pattern for this, and so I decided to lower the front and back armholes by 1cm each.
If we’re being really picky here, this does mean that the centre of the sleeve would be 1cm back from the shoulder seam (since the front armhole was 2cm shorter and the back armhole remained the same), but with the loose fit I didn’t think this would be much of an issue. I could also have just extended the front armhole down by 2cm and left the back as is, but I thought this might mean the side seams wouldn’t match up properly.
In order to do this stage, I had to decide what size sleeve to cut. I tried a size 4 on my arm which seemed a little on the large side, and so I went with size 3. I measured the length of the armhole on the pattern and tried to make sure mine were the same length.
3. A shoulder dart
This made total sense as a great way of creating more room for my rounded back but I thought would look odd on a hoodie so didn’t go any further with this. I did however come across this helpful video by Susan Elias about removing a shoulder dart in case I changed my mind or wanted to on a future project:
4. Cut a smaller size
I reduced the width of the back piece, cutting on the line indicated by arrows:

Third toile
I reused the fabric of my second toile to make the above adjustments on the bodice, and cut two sleeves. By reusing the bodice, this meant the SA had been cut off the armholes. In order to attach the sleeves, I marked the SA on the sleeve where it meets the bodice, and lined this up with the raw edge of the bodice armhole. I then used a large zig zag stitch, trying to catch only a small amount of the bodice armhole.

This was the final toile:


I was really pleased with the result as it was miles better than where I started, and the shoulder seam sat in a better place. I could feel a little tightness around my upper arm but I knew that my fashion fabric was a little more lightweight and stretchy and so I left it as is.
Final fitting note
Throughout my fitting process I knew that the front horizontal balance line (HBL) if marked would be raised at the front, seeing that the front hem was higher than the back. However with so many changes required to the back and shoulders, and with the front looking OK, I was prepared not to add any more complication to my project. This is something I do need to work on in the future though.
Find me on Instagram, Facebook, YouTube, Bloglovin' or scroll to the bottom to subscribe to my monthly newsletter.
Links
I have no affiliations, I'm just a keen buyer and user. A UK supplier may be linked, please try to source items from your favourite independent stores.


Comments