
How to pattern match a seam
- MingMakes
- Jun 14, 2021
- 3 min read
Updated: Jul 21, 2022

This seemed like an interesting challenge for me, having watched contestants on the Great British Sewing Bee create great results with it. I decided to try pattern matching for the first time on the Clemence skirt from the Tilly and the Buttons book Love At First Stitch.

It is a pattern made up of rectangles and so I thought it would be perfect to try this out on the straight back seam. Here is the back seam of my finished skirt:

Tutorial - Pattern matching a seam
In this pattern, the two back pieces are identical rectangles and the seam allowance is 1.5cm. I am demonstrating this on a scaled down version in this post and video. Read on until the end where I share the two rookie errors I made!
Step 1 - Cut the first piece and press the seam allowance under
Cut the first piece in fabric in a single layer. Remember that the pattern piece needs to be flipped back-to-front so that the two back pieces are a mirror image. Here I have cut the piece with the wording on the pattern faced down. (In this particular case, the back pieces are rectangles so this isn't strictly necessary).


Press the seam allowance under at the seam you are matching, in this case it is the centre back seam. I’m using the Clover hot hemmer which is perfect for this kind of task.

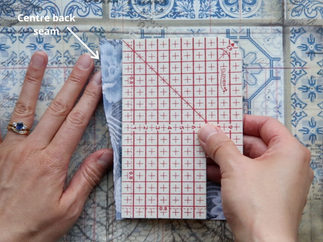


Step 2 - Fold the seam allowance on the paper pattern
Fold the paper pattern for the second back piece, so that the seam allowance on the side you are matching is folded over (not under). In this case it is the centre back seam.


Step 3 - Match this piece to the remaining fabric
Place the first piece onto the remaining fabric wherever you can get the pattern to match, ensuring you have enough fabric to allow for the second piece to be cut next to it.


Step 4 - Place the pattern against the first fabric piece
Butt up the folded edge of the pattern against the first back piece. Ensure the top of the pattern and the first fabric piece are level with each other. Use pattern weights or pins to hold the paper in place on the fabric, but leave the folded edge free.


Step 5 - Unfold the seam allowance and cut the second piece
Make sure the paper pattern is secure, then remove the first back piece. Unfold the seam allowance from the paper pattern, secure this flap to the fabric, then cut out the second piece.


Ta-da! A beautifully matched back seam.
… and here is where I went wrong on my actual Clemence skirt project:
My first mistake:
When I came to cut the second back piece, I forgot to unfold the 1.5cm seam allowance before cutting it out in the fabric. This meant that one piece had the seam allowance, and the other had none. I could have just forgone the pattern matching and sewn it together as normal as the loss of 1.5cm width from the volume of the skirt was not a concern.
However I was determined for something to come of my efforts to this point, so in order to get the pattern matching I went with half the seam allowance on each piece which worked nicely, and was fine with the invisible zip. This meant one back piece was 1.5cm narrower than the other but this wouldn’t be noticeable with all the gathering.
My second mistake:
After that, I forgot that the seam allowance on the waistband was still at 1.5cm. I had already gathered and sewed the skirt pieces to match the waistband, so the raw edges of the waistband and that of the back pieces matched at the back seam before inserting the zip. Since I wanted to halve the seam allowance down the back pieces, the waistband had to have the same, so the waist was 1.5cm larger than planned.
Find me on Instagram, Facebook, YouTube, Bloglovin' or scroll to the bottom to subscribe to my newsletter which is published every month or so.
Links
I have no affiliations, I'm just a keen buyer and user. A UK supplier may be linked, please try to source items from your favourite independent stores.


